
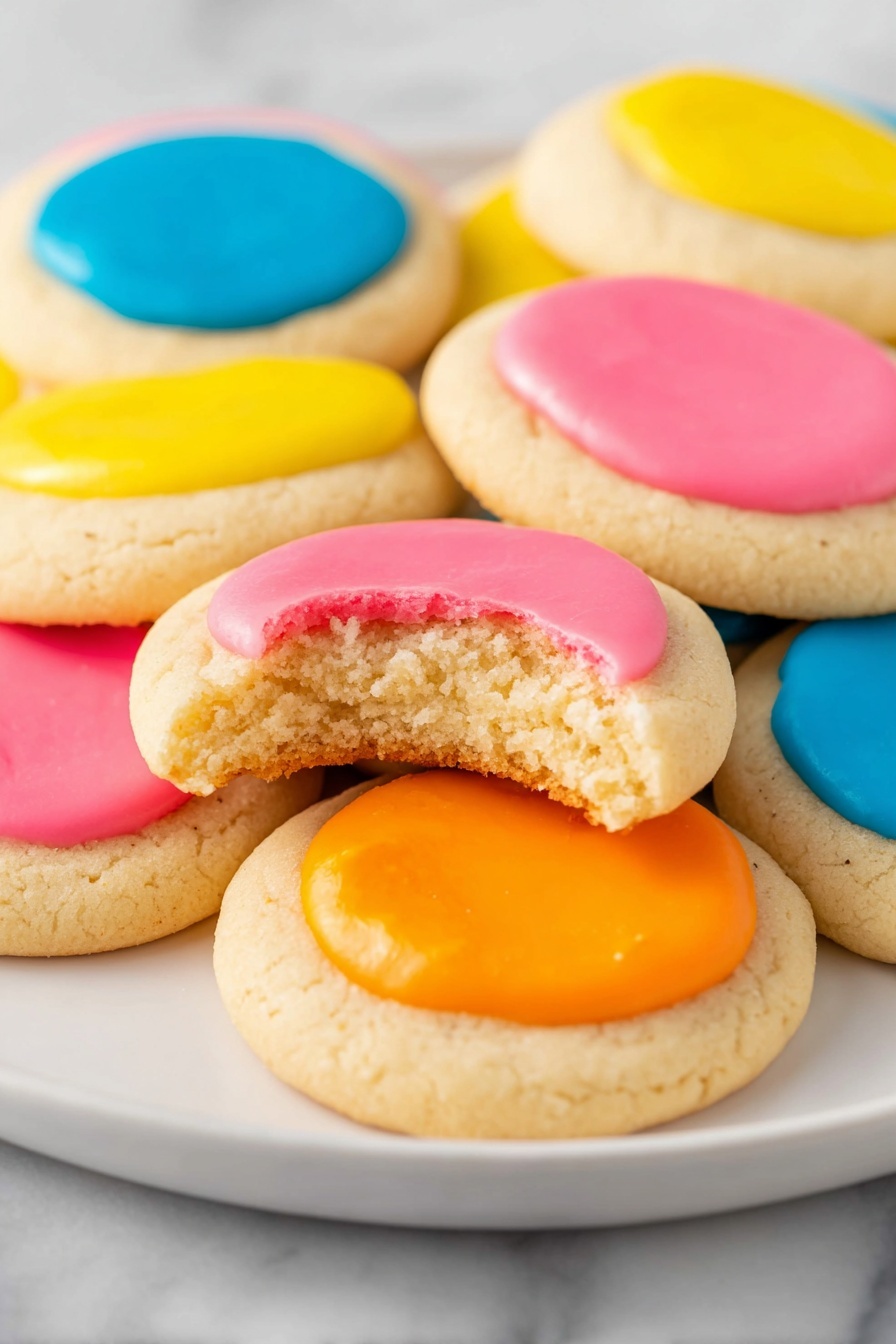
There’s just something incredibly charming about a cookie that’s both simple and stunning at the same time—enter the Thumbprint Cookies with Colored Icing Recipe. These delightful treats aren’t just about looking pretty; they’re soft, buttery, and tangy with that burst of colorful icing that instantly makes you smile. Trust me, once you try this recipe, you’ll want to bake them again and again for every celebration (or just because!). Let me walk you through it so you can achieve the perfect batch every time.
Why You’ll Love This Recipe
- Simple Ingredients: You probably already have everything you need in your pantry and fridge.
- Fun to Customize: The colored icing lets you get creative with your favorite hues and themes.
- Perfect Texture: Soft, buttery dough with just the right bite and a glossy icing finish.
- Great for All Occasions: Whether it’s a casual afternoon snack or a festive party treat, these cookies always impress.
Ingredients & Why They Work
This recipe balances classic cookie ingredients with a touch of vanilla and buttery goodness to create a tender base, while the colored icing adds a playful, eye-catching finish that’s just as tasty as it looks. Each ingredient plays a role, so knowing a bit about them helps you pick the best versions for your batch.
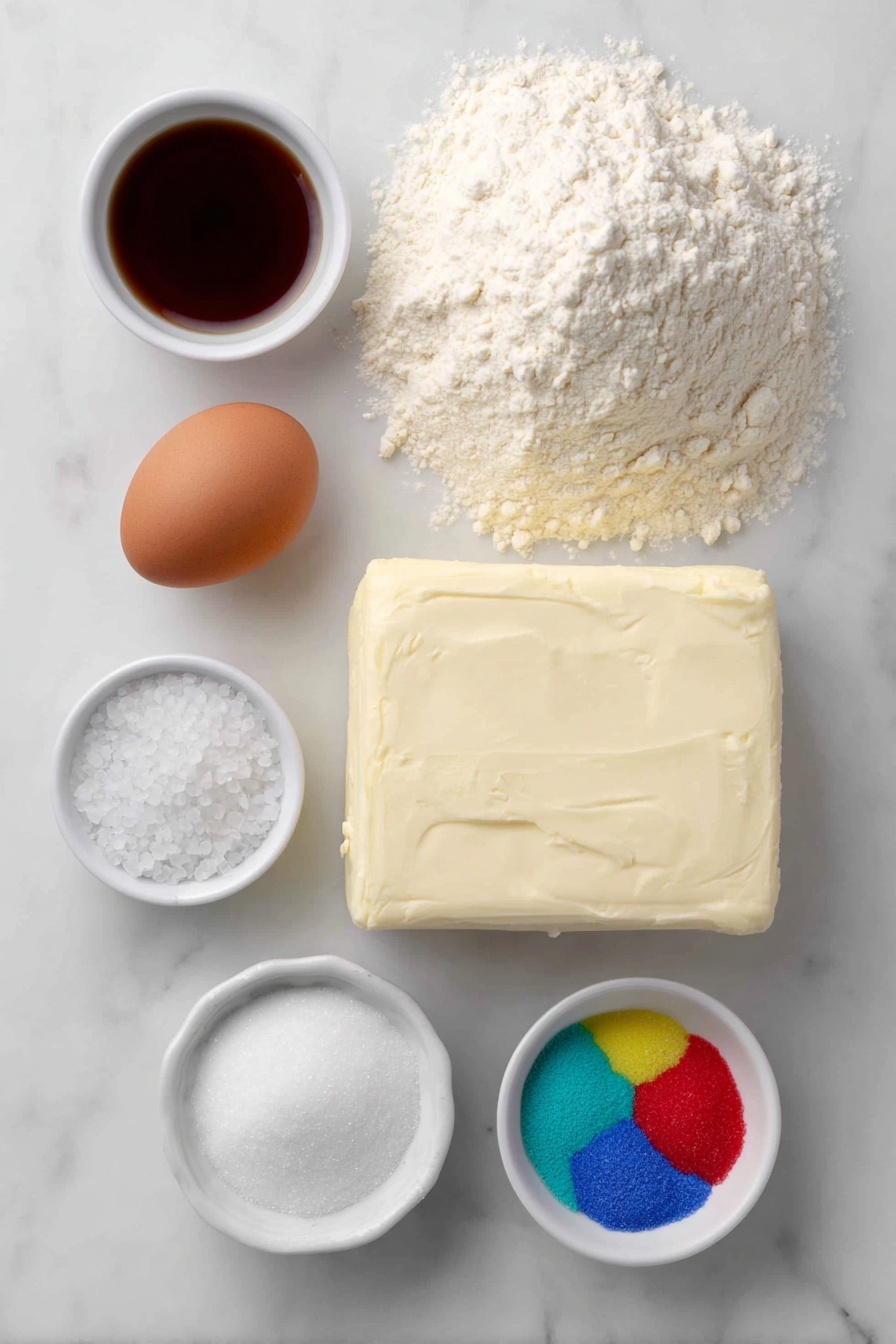
- All-purpose flour: The backbone of the cookie’s structure—don’t skip the proper measuring for the right texture.
- Salt: Enhances flavor, balancing the sweetness and making each bite pop.
- Unsalted butter: Use room temperature butter for better creaming and a rich, tender crumb.
- Granulated sugar: Sweetens and helps the cookie’s edges lightly caramelize.
- Egg: Binds everything together and adds moisture; room temperature eggs blend more easily.
- Clear vanilla flavoring: A subtle, classic flavoring that keeps the dough light and perfect for colorful icing.
- Powdered sugar: For the icing, it creates that smooth and sweet coating perfect for coloring.
- Whole milk: Helps thin the icing just enough for filling the thumbprint without it running over the edges.
- Gel food coloring: Goes a long way in vibrant color without messing with icing consistency.
Make It Your Way
I love switching up the icing colors depending on the season or holidays—pretty pastel blues and pinks for spring, bright reds and greens for Christmas. You could even dip your thumb in a little flour before making the indentation for a neater, cleaner well. Feel free to experiment with different flavor extracts in the icing too, like almond or peppermint, for a unique twist!
- Variation: I once made these with lemon extract and swapped the vanilla for this in both cookie dough and icing—it’s a refreshing option, especially in warmer months.
- Dietary tweaks: I’ve had success substituting half the flour with almond flour for a nuttier flavor; just watch the dough texture since moisture levels shift slightly.
- Difficulty level: Perfect for beginner bakers since every step is straightforward, but the results are anything but basic!
Step-by-Step: How I Make Thumbprint Cookies with Colored Icing Recipe
Step 1: Cream Butter & Sugar to Fluffy Perfection
Start by letting your butter soften to room temperature—that’s key for creaming with sugar properly. Use a hand mixer and beat the butter and sugar together on medium speed until super smooth and fluffy, about 2-3 minutes. This little step helps give the cookies that tender and airy texture.
Step 2: Mix in Egg and Vanilla
Next, add the egg and clear vanilla flavoring. Beat on medium-low until everything’s melded into one beautiful, glossy mixture. I always make sure my egg is room temp ahead of time to avoid any surprise lumps or curdles.
Step 3: Incorporate Dry Ingredients Gently
Combine your flour and salt separately. Slowly add this into your wet ingredients on low speed, just until the dough starts to come together—no overmixing here, or your cookies might be tough. Use a rubber spatula to scrape down the bowl to make sure everything’s evenly mixed.
Step 4: Chill the Dough for Best Results
Pop the dough in the fridge for 30 to 60 minutes. This step makes the dough easier to handle and helps the cookies bake without spreading too much. I personally find 45 minutes is perfect—long enough to firm up but not too long that you’re impatiently waiting.
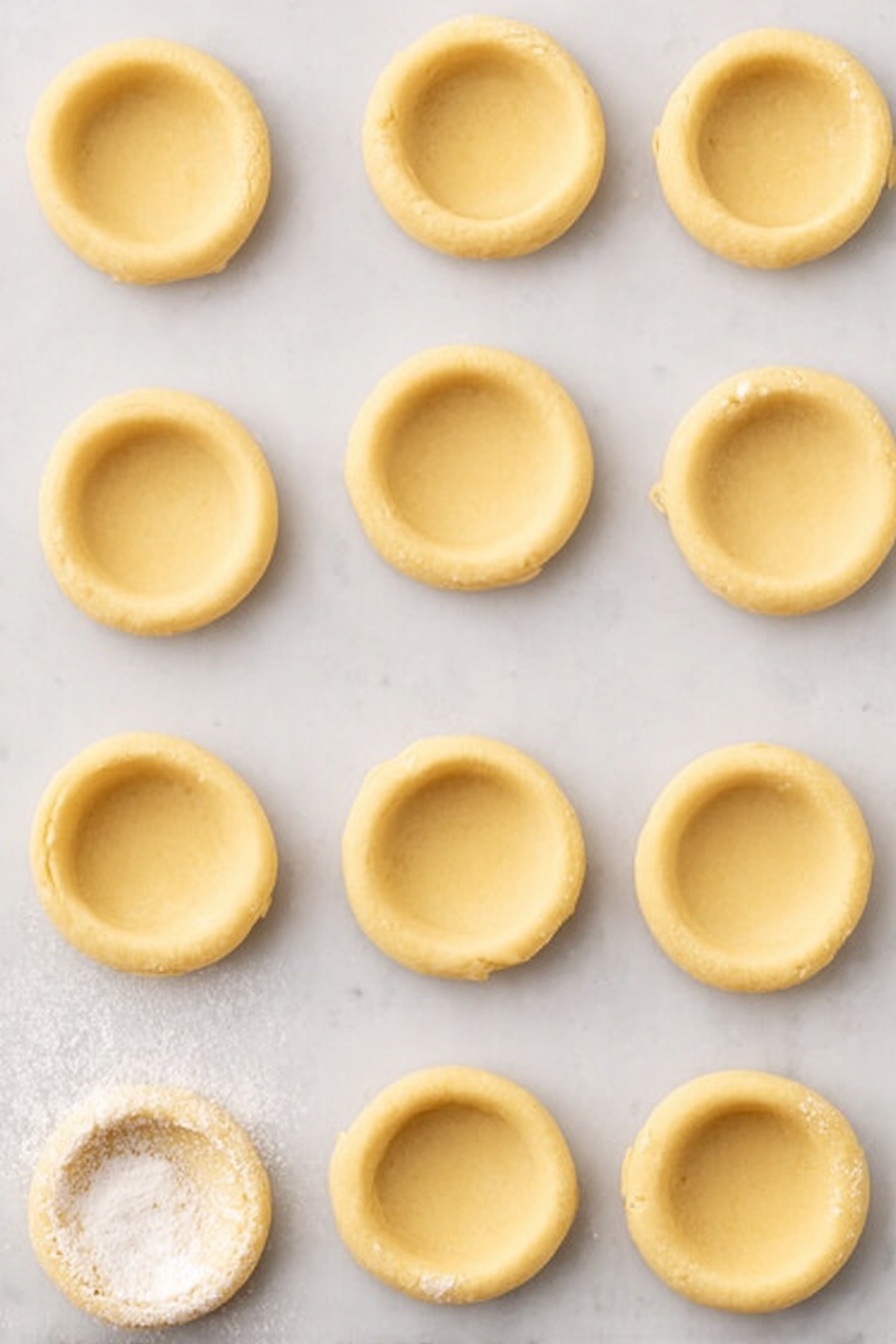
Step 5: Shape and Indent the Cookies
Preheat your oven to 350°F and line your baking sheets with parchment. Using a tablespoon scoop, portion out even dough balls, then roll smooth between your palms. Space them about 2 inches apart so they bake evenly. Then gently press your thumb or a small spoon into each ball to make that trademark thumbprint—just don’t press too deeply!
Step 6: Bake and Cool
Bake for 10 to 12 minutes or until you see the edges just starting to turn golden. When they come out, let them cool on the pan for 5 minutes so they set up before transferring to a rack to cool completely. This prevents the indents from cracking or filling mishaps.
Step 7: Make and Fill with Colored Icing
Whisk powdered sugar, milk, and a splash of vanilla until smooth and thick—not too runny, or it’ll overflow the cute little indentations. Stir in gel food coloring drops for your preferred hues. I like using a piping bag with the tip snipped off for controlled filling. Fill the thumbprints carefully, and then let them sit at room temperature to firm up before serving.
Pro Tips for Making Thumbprint Cookies with Colored Icing Recipe
- Flouring Your Thumb: Dipping your thumb or spoon in a little flour before making indentations prevents sticky dough and messy edges, making a clean, perfect well for icing.
- Adjusting Icing Consistency: Start with less milk and add slowly; if icing gets too thin, just add a bit more powdered sugar to thicken it back up.
- Fixing Rising Indents: If the thumbprints puff up during baking, gently press down the indentation with your finger while the cookie is still warm for a more defined look.
- Patience with Icing: Let the icing firm up at room temperature overnight if possible; it won’t harden like royal icing, but it will set just enough to avoid messy stacking.
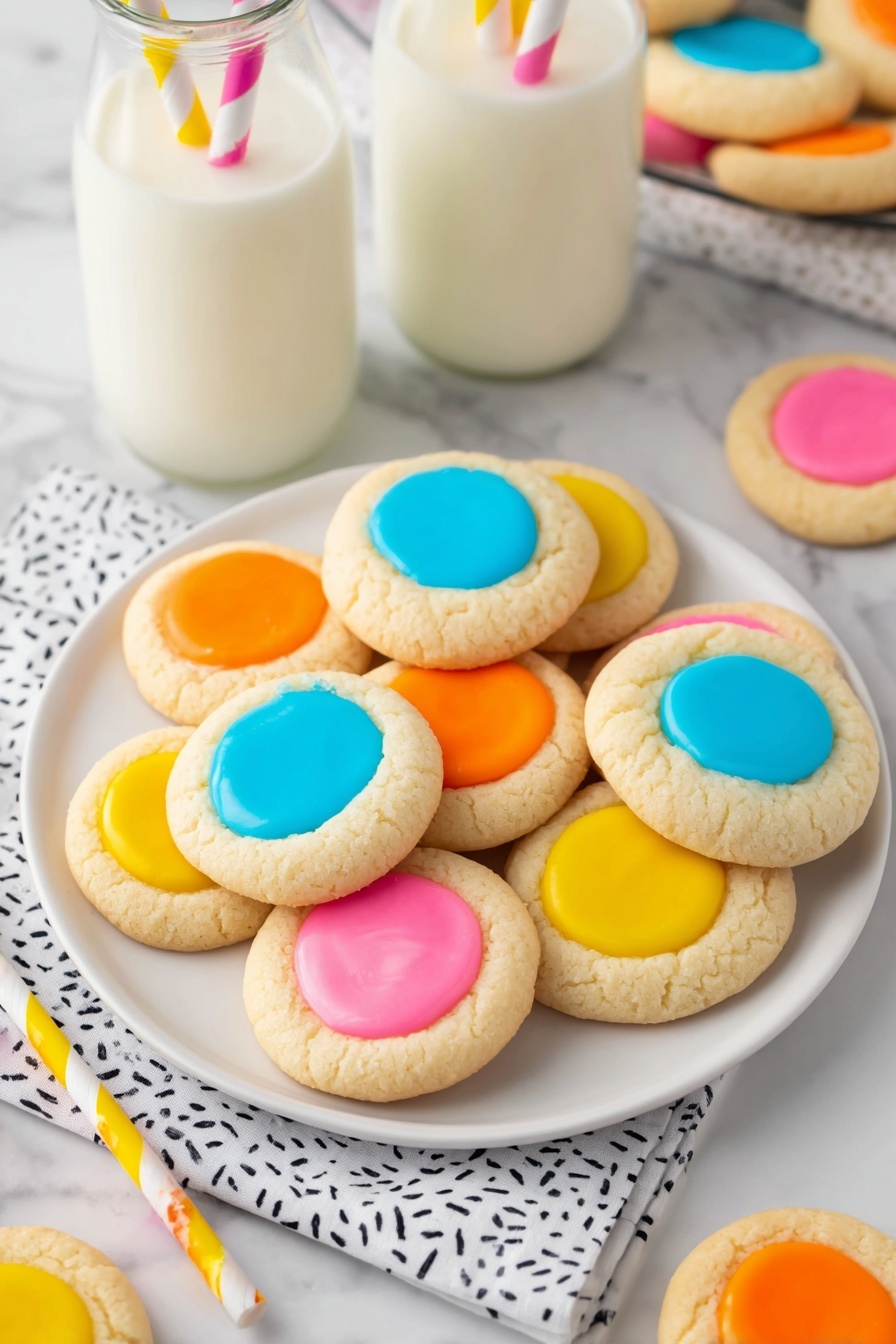
How to Serve Thumbprint Cookies with Colored Icing Recipe
Garnishes
I often top these cookies with a tiny sprinkle of edible glitter or colored sugar crystals on the icing before it sets, just to add a bit of sparkle and texture. Sometimes a few mini sprinkles work wonders for a festive look without overpowering the colorful icing itself.
Side Dishes
They’re perfect alongside a cozy cup of tea or coffee, and if it’s a party, I like pairing them with a light fruit salad or a platter of cheese and nuts to balance the sweetness.
Creative Ways to Present
For birthdays or holidays, arrange the cookies on a tiered stand with ribbon accents matching the icing colors. I’ve also used cookie boxes with parchment and tissue paper as sweet little gifts. You can even pipe little smiley faces or seasonal shapes in the icing for kid-friendly fun.
Make Ahead and Storage
Storing Leftovers
I store these thumbprint cookies in a single layer in an airtight container at room temperature—they stay fresh for about 4-5 days. If you have leftovers, avoid stacking them immediately after icing, to prevent smudging. I let mine rest overnight before putting on a lid.
Freezing
I’ve found that freezing the cookie dough balls before baking works beautifully. Simply scoop and roll, then freeze them in a single layer on a tray before transferring to a freezer bag. When ready, thaw overnight in the fridge and then bake as instructed. Baked cookies freeze well too but only before icing, since the icing doesn’t do as well frozen.
Reheating
Since these cookies are best fresh, I usually eat frozen ones straight after thawing at room temperature. But if you want a warm cookie, pop them in a 300°F oven for 5 minutes—just be careful not to melt the icing or dry out the cookie.
FAQs
-
Can I use a different flavor in the icing for the Thumbprint Cookies with Colored Icing Recipe?
Absolutely! While the recipe uses clear vanilla to keep the icing light in both color and flavor, you can swap in other extracts like almond, lemon, or peppermint. Just start with a small amount since some extracts are stronger and might affect the consistency slightly.
-
What’s the best way to get a clean indentation for the thumbprint cookies?
My best trick is to lightly dust your thumb or spoons with flour before pressing into the cookie dough balls—this stops sticking and keeps the indentation neat. Also, don’t push too hard—just enough to create a well about 3/4 to 1 inch wide without breaking the dough through.
-
Can I make these cookies without the colored icing?
Sure! The cookies are delicious on their own—soft, buttery, and lightly sweetened. You can also substitute a small spoonful of jam or chocolate in the thumbprint if you prefer a different filling. Just keep in mind that the colored icing is what makes them extra special and festive.
-
How do I store these cookies after icing them?
Once iced, let the cookies sit at room temperature until the icing firms up (this can take several hours or overnight). Store them in a single layer in an airtight container to avoid smudging. Avoid stacking until the icing is set to prevent any damage.
Final Thoughts
This Thumbprint Cookies with Colored Icing Recipe has become my go-to when I want something both nostalgic and fun. It’s one of those recipes that brings out the kid in me every time I fill those little wells with colorful icing. But more than that, it’s just a reliable and delightfully tasty treat that’s easy to make and impresses everyone who gets a taste. I can’t wait for you to try it—you’ll see how quickly these cookies become a beloved staple in your kitchen, just like they did in mine!
Print
Thumbprint Cookies with Colored Icing Recipe
- Prep Time: 15 minutes
- Cook Time: 12 minutes
- Total Time: 1 hour 7 minutes
- Yield: 24 servings
- Category: Dessert
- Method: Baking
- Cuisine: American
- Diet: Vegetarian
Description
These Thumbprint Cookies with Icing are soft, buttery cookies with a colorful, sweet icing in the center indentations. Perfect for gifting or a delightful treat, they combine a classic cookie base with a fun decorating twist, making them ideal for any occasion.
Ingredients
Cookies:
- 2 cups all-purpose flour
- ½ teaspoon salt
- 1 cup unsalted butter softened to room temperature
- ⅔ cup granulated sugar
- 1 large egg room temperature
- 1 teaspoon clear vanilla flavoring
Colored Icing:
- 2 cups powdered sugar sifted
- 2-3 tablespoons whole milk
- ½ teaspoon clear vanilla flavoring
- 2-3 drops gel food coloring
Instructions
- Prepare Dry Ingredients: In a medium bowl, combine the all-purpose flour and salt. Set aside for later use.
- Cream Butter and Sugar: In a large mixing bowl, add the softened unsalted butter and granulated sugar. Using a hand mixer on medium speed, cream together for 2-3 minutes until smooth and fluffy.
- Add Egg and Vanilla: Incorporate the egg and clear vanilla flavoring into the butter mixture. Beat for 1-2 minutes until fully combined.
- Mix Dough: Gradually add the dry ingredients to the wet mixture, beating on low speed until a thick, smooth dough forms. Scrape the sides and bottom of the bowl with a rubber spatula to ensure even mixing.
- Chill Dough: Cover the dough with plastic wrap and refrigerate for 30-60 minutes to firm up.
- Preheat Oven and Prepare Baking Sheets: Preheat your oven to 350° F. Line two large baking sheets with parchment paper.
- Shape Cookies: Using a 1 tablespoon cookie scoop, portion out the chilled dough and roll into smooth balls. Place on prepared baking sheets, leaving about 2 inches between each ball.
- Create Indentations: Use a small rounded measuring spoon or your thumb to press a ¾–1 inch wide indentation in the center of each dough ball, flattening slightly without pressing through the bottom.
- Bake Cookies: Bake for 12 minutes or until the bottoms just start to turn lightly golden.
- Cool Cookies: Let the cookies cool on the baking sheets for 5 minutes before transferring to a wire rack to cool completely.
- Make Icing: In a large bowl, whisk together sifted powdered sugar, 2 tablespoons whole milk, and clear vanilla flavoring until thick and smooth. Adjust thickness with additional milk 1 teaspoon at a time as needed.
- Add Food Coloring: Stir in 2-3 drops of gel food coloring until color is uniform. For multiple colors, divide icing as desired and color each separately.
- Fill Indentations: Using a small spoon or a piping bag with the tip cut off, carefully fill each cookie indentation with colored icing, avoiding overfilling.
- Set Icing: Allow the iced cookies to sit at room temperature to let the icing firm up before storing or serving.
Notes
- Store iced cookies at room temperature in a single layer in an airtight container for 4-5 days.
- Freeze cookie dough balls or baked cookies (without icing) in airtight containers for up to 2 months. Thaw dough in the refrigerator before shaping and baking.
- Dip your thumb or measuring spoon in flour before pressing into the dough to prevent sticking.
- If indentations rise during baking, gently press them down while warm for better icing space.
- Allow icing to firm up overnight at cool room temperature for best stacking and presentation.
Nutrition
- Calories: 140 kcal
- Sugar: 9 g
- Sodium: 30 mg
- Fat: 7 g
- Saturated Fat: 4 g
- Unsaturated Fat: 2 g
- Trans Fat: 0 g
- Carbohydrates: 19 g
- Fiber: 0 g
- Protein: 1 g
- Cholesterol: 20 mg


