
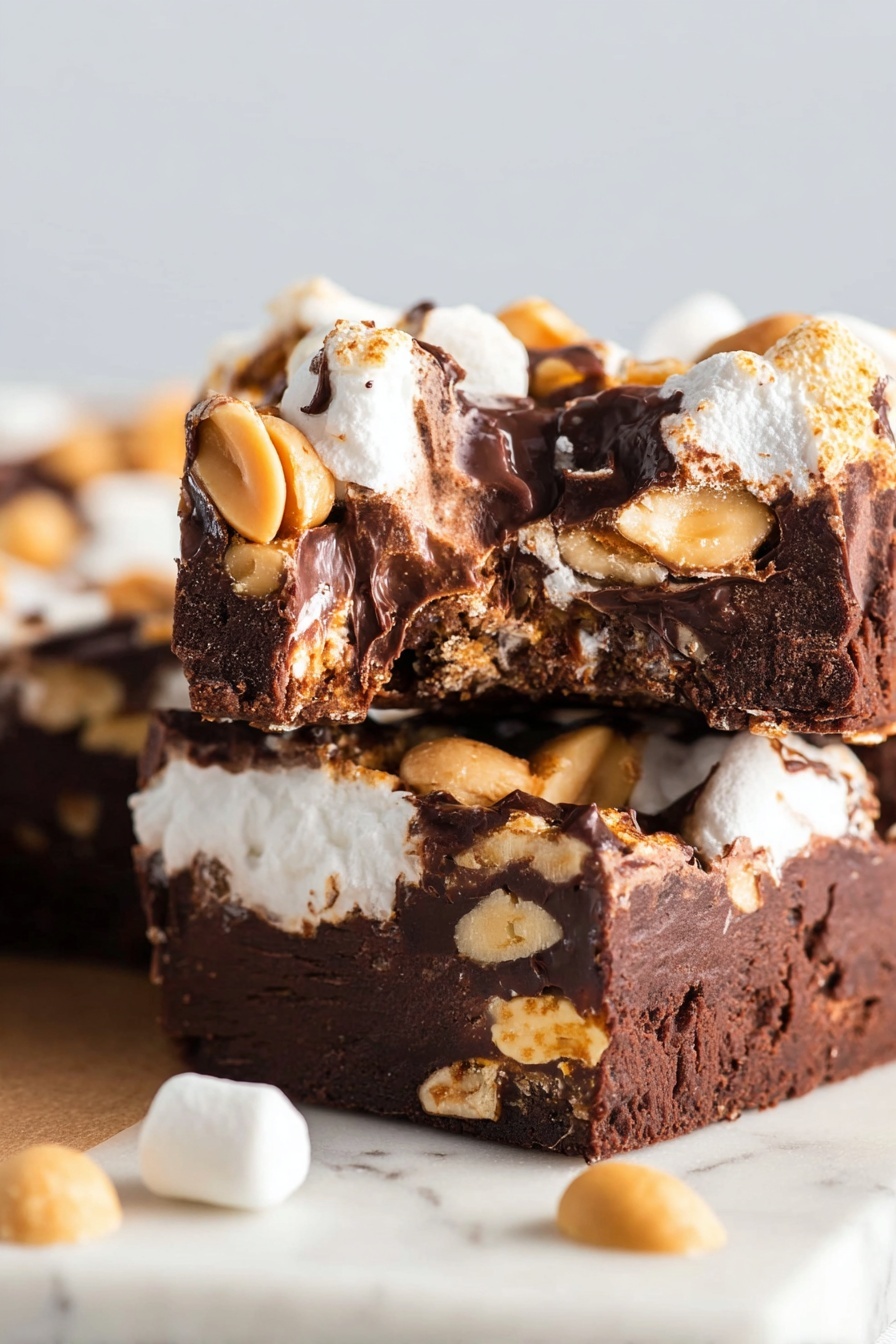
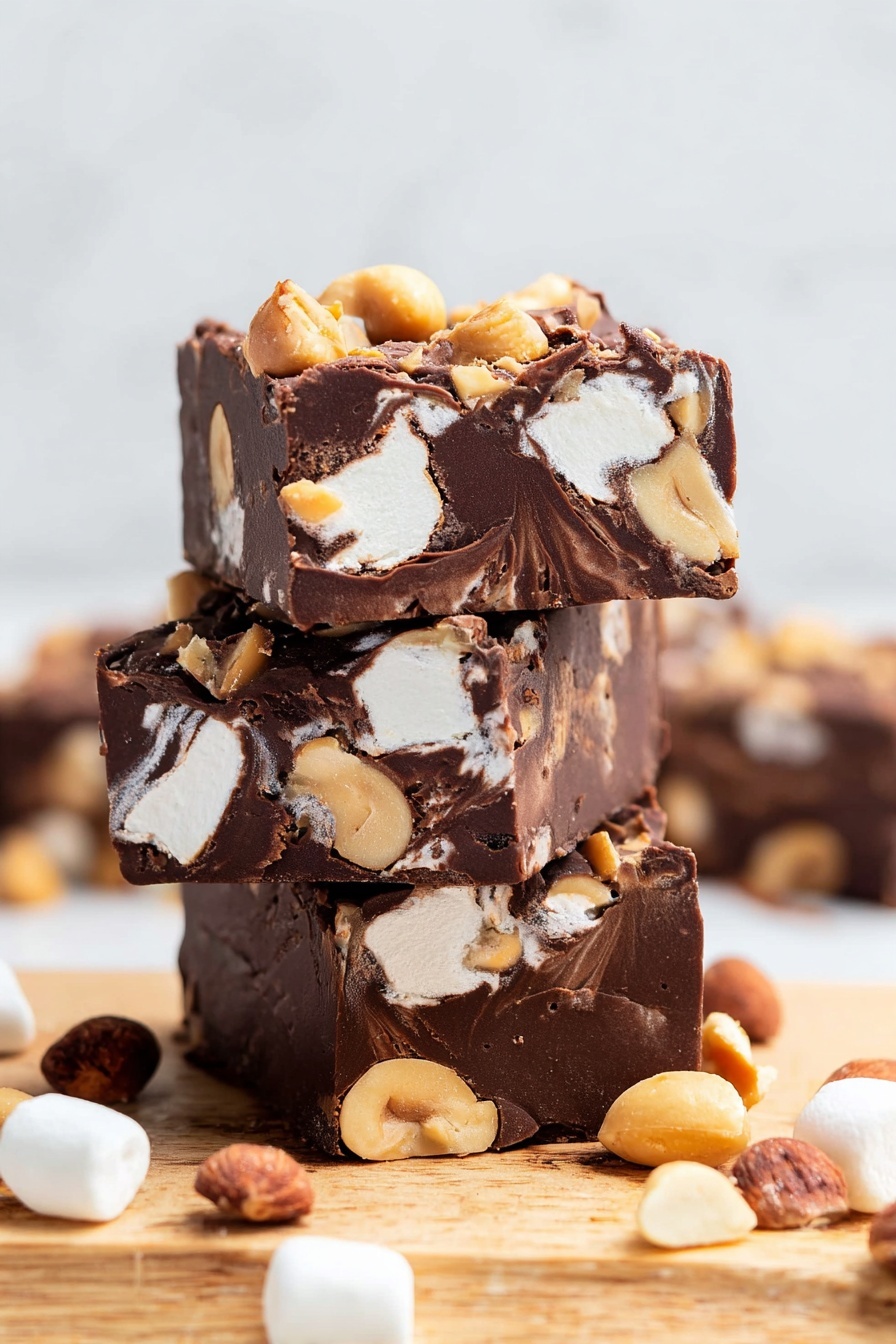
If you’re craving a no-fuss, crowd-pleasing treat that’s super rich and full of delightful textures, you’re in the right place! This Easy Rocky Road Fudge Recipe is one of my absolute favorites to whip up when I want something sweet but don’t want to fuss with a complicated process. It’s smooth, chocolatey, with gooey marshmallows and crunchy peanuts all wrapped into one heavenly bite. Trust me, once you make this, you’ll reach for it again and again — and honestly, friends will be begging you for the recipe!
Why You’ll Love This Recipe
- Super Simple: No baking, no thermometer—just melt, mix, and chill.
- Perfect Texture Combo: Creamy fudge, chewy marshmallows, and crunchy peanuts, all in one bite.
- Great for Gifting: Wrap it up in pretty foil or cellophane for easy, homemade gifts everyone loves.
- Flexible and Fun: Customize with extras like caramel drizzle, different nuts, or even seasonal candies.
Ingredients & Why They Work
Each ingredient in this easy Rocky Road fudge plays its part to create that rich chocolate flavor balanced by sweet marshmallow softness and crunchy, salty peanuts. When you pick ingredients carefully, the final fudge is smooth and luscious without any extra effort.
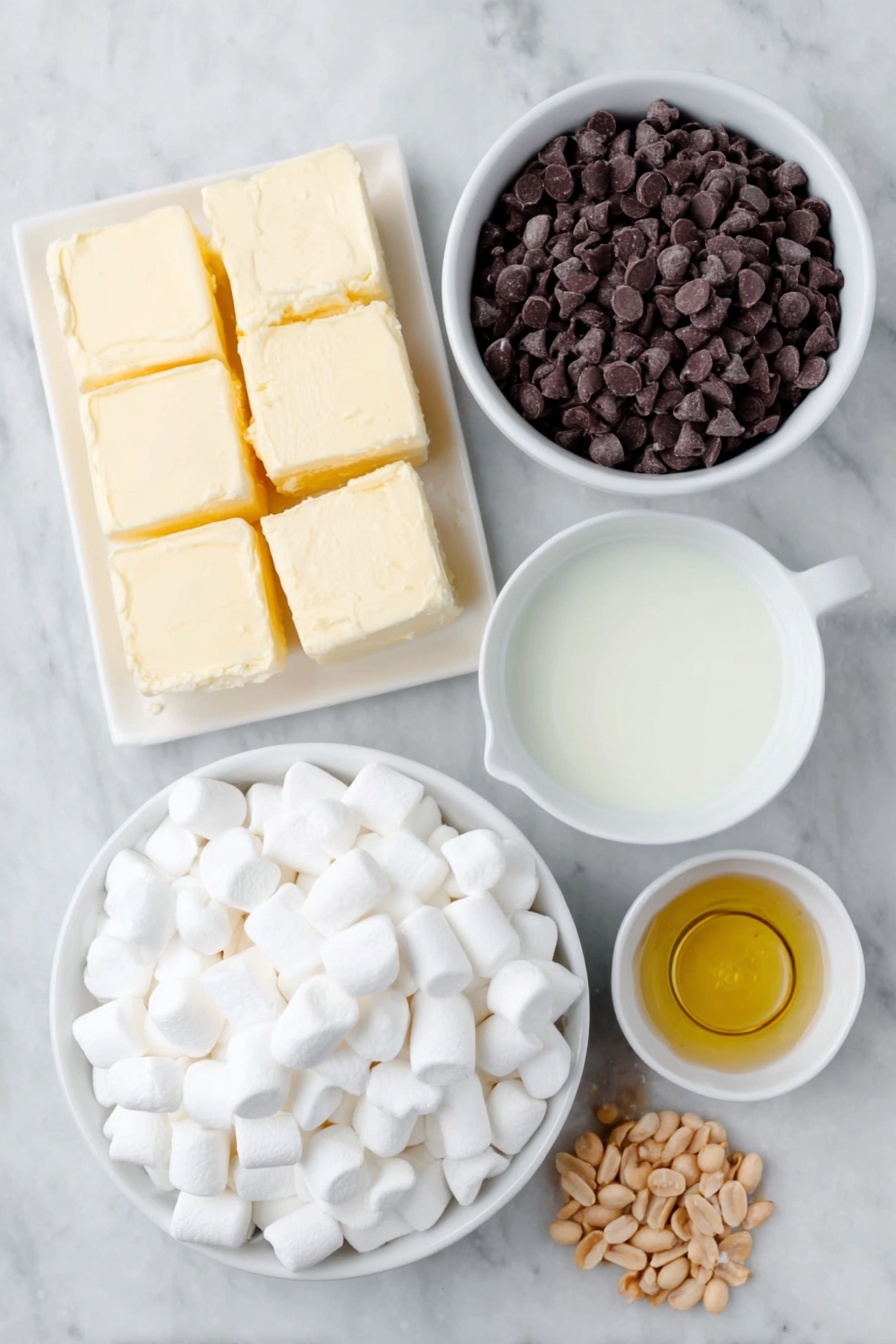
- Semi-sweet chocolate chips: These melt beautifully and give you a deep chocolate base that’s not too bitter or too sweet.
- Sweetened condensed milk: The magic binder that makes this fudge silky and creamy without needing sugar granules or any other sweeteners.
- Butter: Adds richness and helps the chocolate melt evenly. I like to use cold butter cubed for better control.
- Vanilla: Just a teaspoon brightens all the chocolatey goodness with a subtle warmth.
- Mini marshmallows: They create that classic Rocky Road chewiness, adding softness to every bite.
- Salted peanuts: I prefer salted peanuts for that perfect sweet-and-salty balance, but unsalted works too.
Make It Your Way
One of the things I love most about this easy Rocky Road fudge recipe is how flexible it is. I often change up the nuts or drizzle caramel or even mix in dried fruit depending on the season or who I’m making it for. Go ahead and get creative!
- Nut swap: I’ve swapped salted peanuts for pecans or almonds, and each variation brings a unique crunch I adore.
- Nut-free option: For nut-free, try substituting toasted coconut flakes or sunflower seeds to keep that texture contrast. I’ve done this for kid-friendly treats with great results.
- Extra sweet: Sometimes I melt in a few chunks of white chocolate or drizzle caramel on top before chilling—adds a luscious, sticky twist.
- Mini marshmallows temperature trick: If you want those marshmallows more intact and less melted, I like to freeze them briefly before mixing so they hold their shape better.
Step-by-Step: How I Make Easy Rocky Road Fudge Recipe
Step 1: Prep Your Pan Like a Pro
I line my 9×13 baking dish with foil and spray it with nonstick spray. This little step saves so much hassle later because you can just lift the whole slab out once it’s set. No sticky, messy digging required, trust me.
Step 2: Melt the Chocolate Mixture Gently
Combine chocolate chips, sweetened condensed milk, and cubed butter in a medium saucepan over medium heat. Stir constantly to prevent burning and watch as the chocolate chips melt into a beautiful glossy mix. Patience is key here—don’t rush the melt or turn up the heat too high, or you risk going grainy. Once smooth and silky, remove from heat immediately.
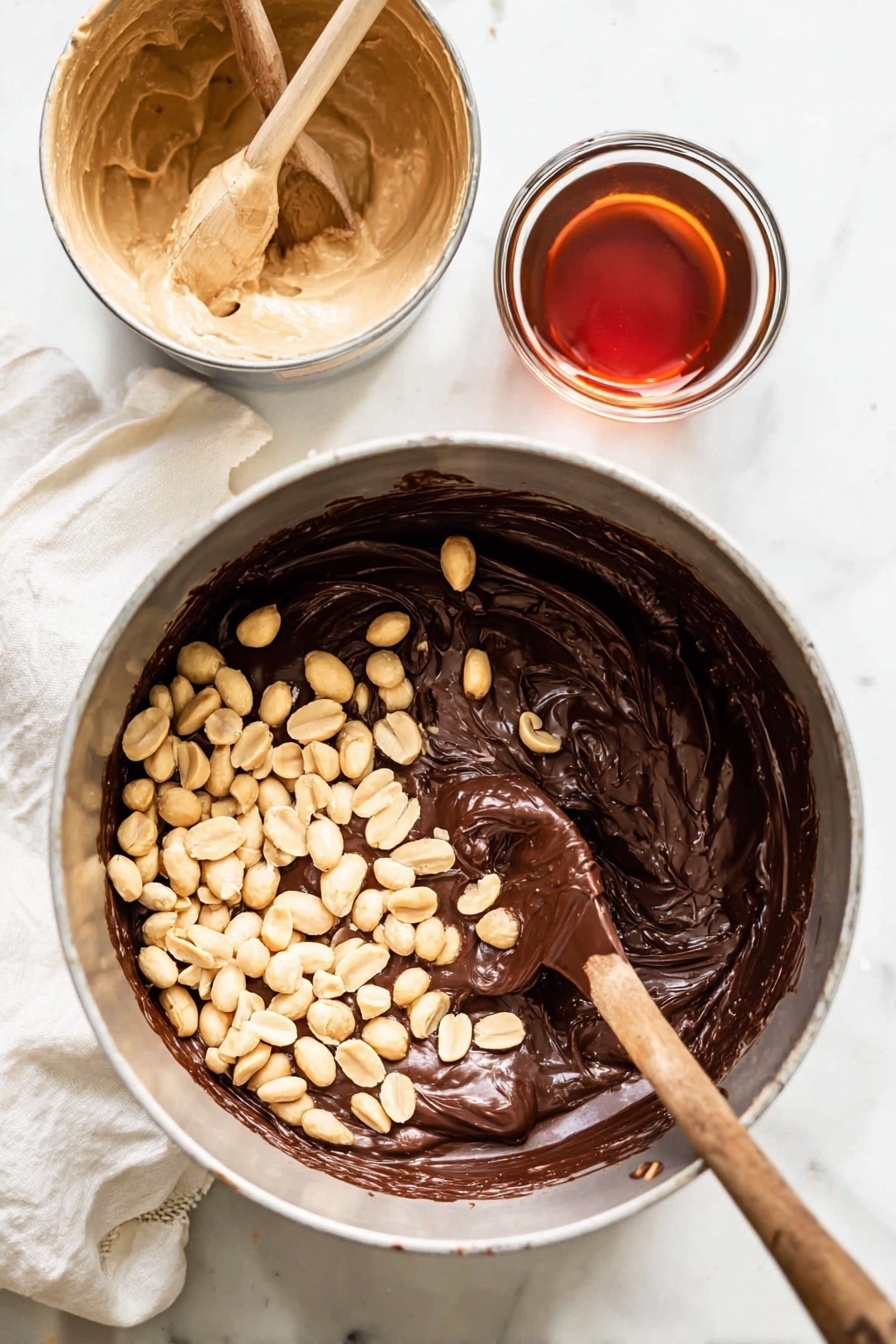
Step 3: Stir in Peanuts and Vanilla
Add your salted peanuts and a teaspoon of vanilla to the melted chocolate mixture and stir it in well. I like to save a few peanuts aside to sprinkle on top for a pretty, crunchy finish.
Step 4: Get Marshmallows Ready
Place your mini marshmallows in a large bowl. Here’s where you can decide if you want them to melt a bit or keep their shape: if you want them mostly intact, wait a few minutes for the chocolate to cool slightly before pouring it over marshmallows.
Step 5: Combine and Spread
Pour the chocolate-peanuts mixture over the marshmallows and stir gently until everything is evenly coated. Then transfer it all into your prepared pan and spread out evenly. I find using an offset spatula helps here.
Step 6: The Finishing Touch
Sprinkle the top with the extra mini marshmallows and salted peanuts you reserved. This not only looks inviting but adds a lovely texture contrast to the top of the fudge.
Step 7: Chill and Set
Pop your pan into the refrigerator and let it chill until firm—anywhere from 2 to 3 hours or even overnight if you can wait that long. The longer it sets, the easier it is to slice neatly.
Pro Tips for Making Easy Rocky Road Fudge Recipe
- Freeze Marshmallows First: I learned freezing mini marshmallows before mixing helps prevent them from melting too much and keeps that desirable chew.
- Use Cold Butter Cubes: Adding cold butter ensures the chocolate melts evenly without scorching and gives a glossy finish.
- Warm Knife Technique: For clean, neat slices, warm your knife under hot water, dry it off, and slice with smooth motions—no crumbling mess.
- Foil Lining Saves Cleanup: Lining with foil and spraying with nonstick saves you from scraped and stuck fudge nightmares—definitely do this!
How to Serve Easy Rocky Road Fudge Recipe
Garnishes
I usually stick with extra mini marshmallows and salted peanuts on top because, honestly, it’s classic and just looks so inviting. But sometimes I like to add a tiny sprinkle of flaky sea salt or drizzle a bit of caramel sauce before chilling if I’m feeling fancy. It really elevates the flavor.
Side Dishes
Since this fudge is rich, I like to serve it alongside fresh fruit like strawberries or crisp apples. For something more decadent, a scoop of vanilla ice cream makes a fabulous pairing. And trust me, a cup of strong coffee or black tea brings balance to the sweetness perfectly.
Creative Ways to Present
For holidays or parties, I cut the fudge into bite-sized squares and layer them in colorful tins with parchment paper. Another favorite of mine is to serve these cutesteppy-stacked on a rustic wooden board with little bowls of extra nuts and marshmallows around for guests to snack on. Wrapping individual pieces in cellophane with a ribbon turns them into lovely edible gifts too!
Make Ahead and Storage
Storing Leftovers
I store leftover Rocky Road fudge in an airtight container in the fridge. It stays perfectly chewy and fresh for up to 1 week. I recommend layering pieces with parchment paper to avoid sticky mishaps, and honestly, it often disappears before that!
Freezing
Freezing this fudge works like a charm. I wrap airtight in foil and then place it inside a freezer bag. It freezes beautifully for up to 2 months. When I want to serve it, I thaw it in the refrigerator overnight—no loss in taste or texture.
Reheating
I don’t usually reheat the fudge since it’s meant to be enjoyed cold or room temperature, but if you like it softer, leaving it at room temperature for 20 minutes or so does the trick. Avoid microwaving, or it can become oily and lose that perfect Rocky Road texture.
FAQs
-
Can I use milk chocolate instead of semi-sweet?
Absolutely! Milk chocolate will make the fudge sweeter and creamier. I tend to stick with semi-sweet to balance the salted peanuts and marshmallows, but milk chocolate is a tasty alternative if you prefer sweeter fudge.
-
Do I have to use sweetened condensed milk?
Yes, sweetened condensed milk is key to achieving the creamy, luscious texture. It acts as both a sweetener and binder. I don’t recommend swapping it out for evaporated milk or cream, as it changes the fudge’s consistency drastically.
-
How do I prevent the marshmallows from melting completely?
Try freezing the mini marshmallows for 15-20 minutes before mixing or let the warm chocolate mixture cool for a few minutes before pouring over the marshmallows. Both help keep the marshmallows from melting into the fudge too much.
-
Can I make this recipe vegan or dairy-free?
It’s tricky since sweetened condensed milk and butter are dairy-based, but you could experiment with vegan condensed milk alternatives and vegan butter. I’ve tried vegan chocolate chips but the texture and flavor can differ, so be prepared for some trial and error.
-
How long does the fudge last?
Stored in an airtight container in the fridge, the fudge lasts about a week. For longer storage, freeze it and thaw before serving, and it’ll keep great for up to two months.
Final Thoughts
I have to say, this Easy Rocky Road Fudge Recipe is one I keep coming back to because it’s foolproof, tastes decadent, and can be personalized however you like. Whether you’re making it for the holidays, a birthday, or a simple weeknight treat, it’s always a winner in my household and with friends too. Give it a try—I promise you’ll smile with every bite!
Print
Easy Rocky Road Fudge Recipe
- Prep Time: 10 minutes
- Cook Time: 10 minutes
- Total Time: 3 hours 10 minutes
- Yield: 16 servings
- Category: Dessert
- Method: Stovetop
- Cuisine: American
Description
This rich and decadent Rocky Road Fudge recipe combines creamy semi-sweet chocolate with crunchy salted peanuts and fluffy mini marshmallows for a classic no-bake treat. Ready in under 3 hours, including chilling time, this fudge is perfect for dessert lovers craving a sweet and nutty indulgence with an easy-to-follow stovetop preparation.
Ingredients
Chocolate Mixture
- 3 cups semi-sweet chocolate chips
- 14 ounce can sweetened condensed milk
- 4 tablespoons butter, cubed
- 1 teaspoon vanilla
Mix-ins and Toppings
- 3 cups mini marshmallows, plus a few extra for the top
- 1 cup salted peanuts, plus a few extra for the top
Instructions
- Prepare the Pan: Line a 9×13 inch dish with foil and spray it with nonstick cooking spray for easy removal of the fudge later.
- Melt Chocolate Mixture: In a medium saucepan over medium heat, combine the semi-sweet chocolate chips, sweetened condensed milk, and cubed butter. Stir constantly until the chocolate chips are fully melted and the mixture is smooth.
- Add Peanuts and Vanilla: Remove the saucepan from heat and stir in the salted peanuts and vanilla extract thoroughly.
- Prepare Marshmallows: Place the mini marshmallows in a large mixing bowl ready to receive the chocolate mixture.
- Combine Chocolate and Marshmallows: Pour the warm chocolate mixture over the marshmallows. Mix well to coat. For retaining some marshmallow texture and swirl appearance, allow the chocolate to cool slightly before pouring.
- Transfer to Pan: Spread the fudge evenly into the prepared foil-lined baking dish.
- Add Toppings: Sprinkle extra salted peanuts and mini marshmallows on top to decorate.
- Chill Until Firm: Place the fudge in the refrigerator and chill for at least 3 hours or preferably overnight until completely set and firm.
Notes
- Always use sweetened condensed milk for the best texture and flavor; do not substitute.
- Freeze marshmallows before mixing to help prevent them from melting too much into the fudge.
- Using cold butter helps the chocolate melt evenly without seizing.
- Lining the dish with foil makes it easier to lift out the fudge for cutting.
- For clean slices, warm your knife under hot water, wipe dry, and then cut the fudge.
- For a caramel twist, drizzle caramel on top before chilling to create a delightful variation like Turtle Fudge.
Nutrition
- Calories: 270 kcal
- Sugar: 28g
- Sodium: 70mg
- Fat: 14g
- Saturated Fat: 8g
- Unsaturated Fat: 5g
- Trans Fat: 0.5g
- Carbohydrates: 35g
- Fiber: 1g
- Protein: 4g
- Cholesterol: 20mg


