
If you’re craving something sweet, creamy, and with that classic peanut butter punch, then buckle up because this Easy Peanut Butter Fudge Recipe is about to become your new go-to treat. Honestly, this fudge is one of those recipes that feels fancy but comes together in a snap. Whether it’s for a holiday party, a quick gift, or just because you need a little comfort in your day, it hits all the right notes without any fuss. Stick with me here – I’m going to walk you through it like we’re chatting over coffee, and by the end, you’ll be slicing perfect squares of peanut buttery heaven yourself.
Why You’ll Love This Recipe
- Super Simple: With just a handful of pantry staples, you’ll whip this up faster than you can say peanut butter.
- Crowd-Pleaser: Whether it’s for kids, adults, or that last-minute cookie swap, it’s universally loved.
- Perfectly Creamy & Sweet: The balance between butter, peanut butter, and powdered sugar is spot-on every time.
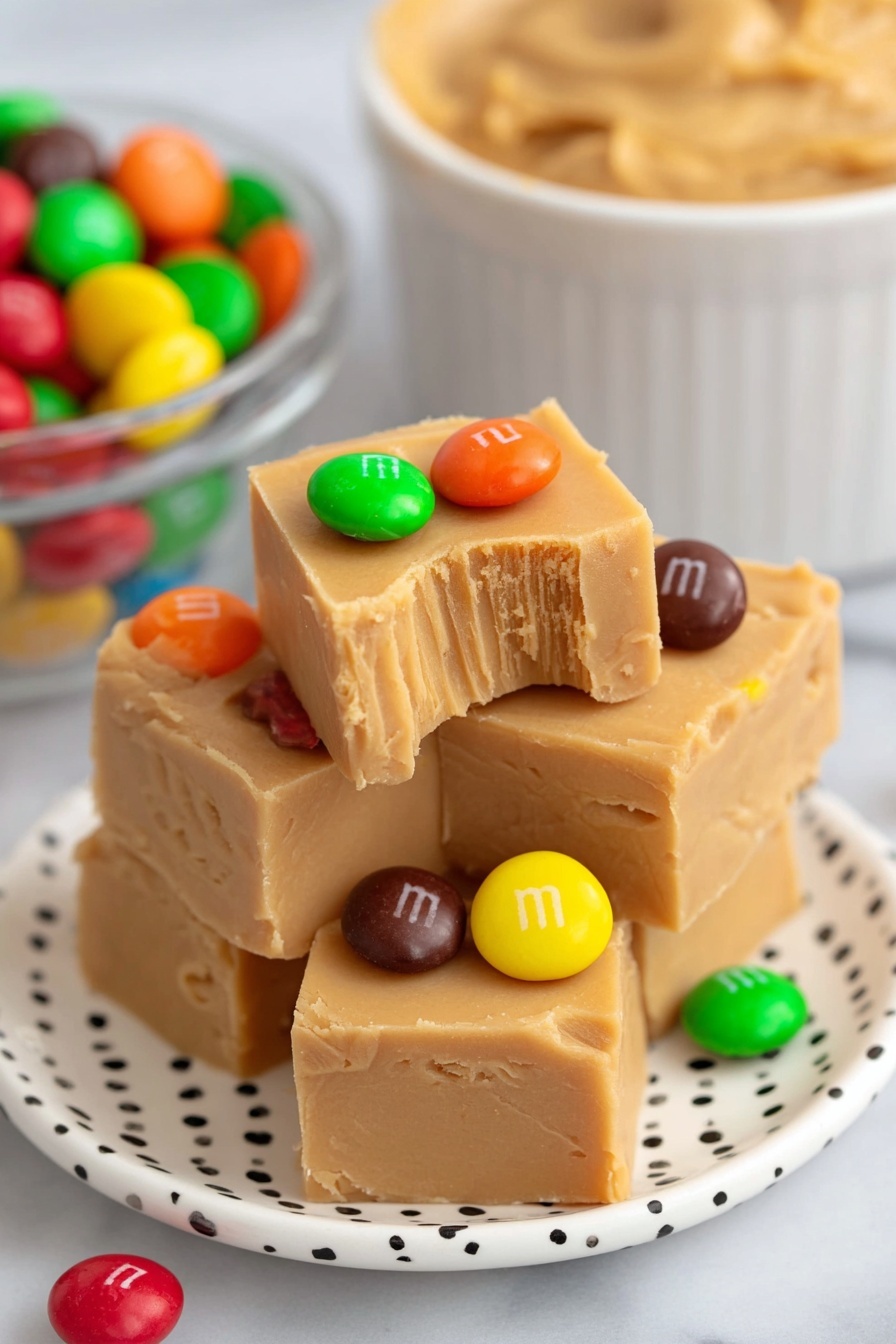
- Customizable Garnish: Add colorful M&M’s or nuts for a festive, fun twist.
Ingredients & Why They Work
This easy peanut butter fudge recipe has a simple, yet perfectly tuned ingredient list. Each one brings its own magic to the fudge, creating a creamy, melt-in-your-mouth texture and that addictive peanut butter flavor you want. Plus, I’ll share why creamy peanut butter and unsalted butter are the dream team for this treat.
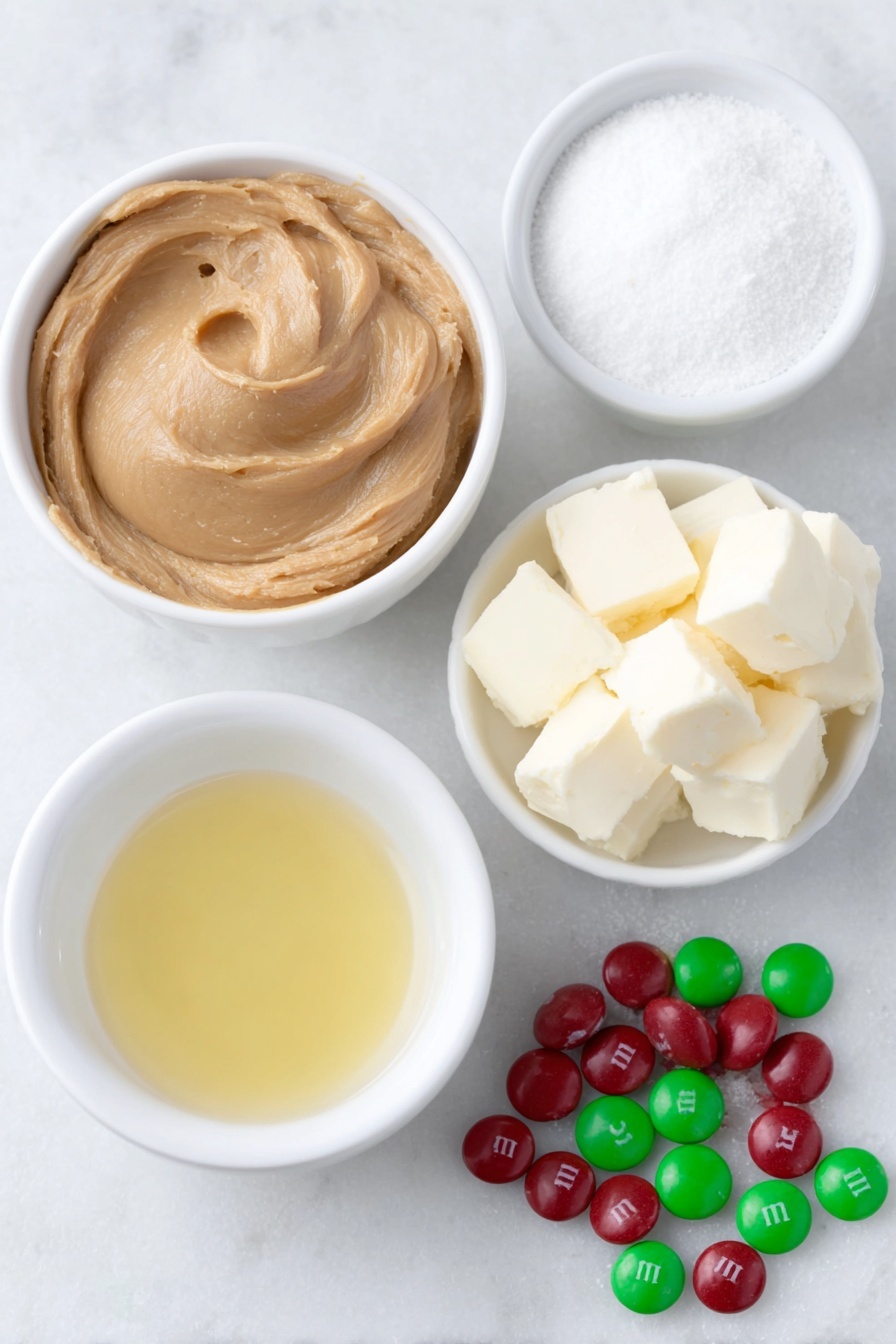
- Water: Just a tablespoon to keep the parchment paper from slipping around in your pan – such a little trick that makes a big difference.
- Unsalted Butter: Provides richness and helps the fudge set up with just the right texture; unsalted gives you full control over the salt content.
- Creamy Peanut Butter: Make sure it’s creamy and NOT natural or no-stir kinds—these can mess with the smooth texture and sweetness.
- Vanilla Extract: Adds a subtle warmth and depth, balancing the sweet and nutty flavors beautifully.
- Powdered Sugar: This is your sweetness and structure all in one—sifting helps prevent lumps and ensures that silky finish.
- M&M’s (optional): Love how these bring a pop of color and a little crunch on top if you’re feeling festive.
Make It Your Way
One of my favorite things about this easy peanut butter fudge recipe is how easy it is to tweak! I often play with it depending on the occasion or who I’m making it for. Adding a pinch of sea salt on top after smoothing the fudge really elevates the flavors for me, but there’s so much room to make it truly your own.
- Nutty Upgrade: Sometimes I stir in chopped roasted peanuts or walnuts for a crunch element that pairs so wonderfully with the creamy base.
- Chocolate Lovers: Drizzle melted dark or milk chocolate on top after it’s set for that extra rich mouthfeel.
- Diet-Friendly: Use powdered erythritol instead of sugar if you’re aiming for a low-sugar version—I’ve tried it and it works surprisingly well.
Step-by-Step: How I Make Easy Peanut Butter Fudge Recipe
Step 1: Prep Your Pan Like a Pro
I always start by prepping my pan thoroughly. Using the bottom of your 8×8 pan as a template, cut a piece of parchment paper the exact size to help smooth the fudge later and prevent sticking. Then, cut an extra piece long enough to hang over the sides – this makes lifting the fudge out a breeze once it’s set.
Now here’s a kitchen hack: instead of just plopping the parchment in place, pour a tablespoon of water into the pan first. This keeps the parchment from moving around as you work your fudge magic. It’s a tiny step I swear by every single time.
Step 2: Melt Butter and Peanut Butter Together
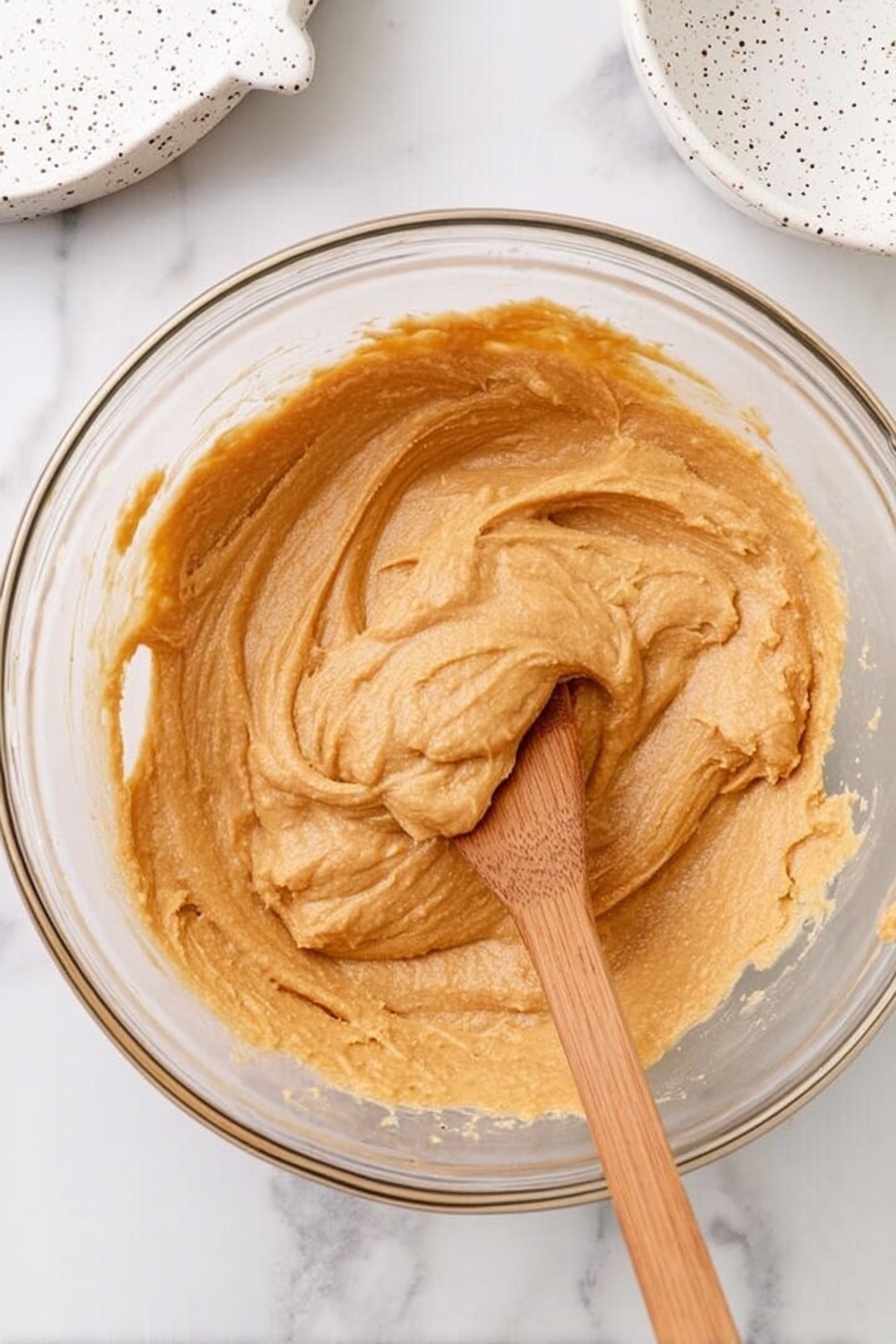
Next, combine your unsalted butter and creamy peanut butter in a microwave-safe bowl. Pop it in the microwave for 60 seconds—don’t worry if it looks like it’s bubbling a bit. Take it out carefully and stir everything together until it’s a smooth, glossy mix. The warmth and melted butter make this fudge incredibly creamy and easy to mix up powdered sugar in the next step.
Step 3: Sweeten and Flavor with Vanilla and Powdered Sugar
Stir in the vanilla extract to add flavor depth before moving on to the powdered sugar. Add the powdered sugar gradually—about a cup at a time—stirring well between additions. The mixture will thicken as you go, and it’s important to make sure there are no white streaks or lumps. This slow incorporation makes the surface silky smooth and prevents grainy bites in your finished fudge.
Step 4: Pour, Smooth, and Chill
Scrape that heavenly peanut butter mixture into your prepared pan and use a spatula to spread it evenly from edge to edge. Now, place your cut piece of parchment on top and gently press or smooth it out to get that classic fudge surface. This parchment “lid” also stops any fridge odors from creeping in while it chills.
Pop your pan into the fridge and chill for about 2 hours. Patience here really pays off—the fudge firms up perfectly and becomes easy to cut without crumbling.
Step 5: Cut and Add Your Signature Touch
After chilling, remove the top parchment. I like to pre-score the fudge with a sharp knife while it’s still in the pan, deciding on the size of pieces upfront. Then, using those overhanging parchment edges, carefully lift the fudge out of the pan and place it on a cutting board.
For clean cuts, warm a sharp knife under hot water, wipe it dry, and slice along your score marks. The warmth helps you cut through the fudge without it sticking to the knife or crumbling.
If you want to get festive, now’s the time to press 2-3 red and green M&M’s (or your choice of colorful candy) onto each piece so they stick as the fudge settles.
Pro Tips for Making Easy Peanut Butter Fudge Recipe
- The Right Peanut Butter: I always use creamy, classic peanut butter brands like Peter Pan or Skippy because natural varieties can cause your fudge to be grainy or separate.
- Sifting Powdered Sugar: Don’t skip sifting your powdered sugar to avoid lumps that ruin the smooth fudge texture.
- Patience is Key: Letting the fudge set for the full 2 hours in the fridge ensures it cuts cleanly and holds its shape.
- Warm Knife Trick: Running your knife under hot water and drying it between cuts gives that perfect, smooth slice without sticking or crumbling.
How to Serve Easy Peanut Butter Fudge Recipe

Garnishes
I love topping my peanut butter fudge with festive M&M’s for holidays or sprinkled crushed peanuts if I want a nice crunch and a little extra nuttiness. A dusting of flaky sea salt on top adds a gourmet touch that really makes the flavors pop. You can even get creative with mini chocolate chips or a drizzle of caramel if you’re feeling adventurous!
Side Dishes
If you’re serving this fudge at a gathering, it pairs beautifully with a hot cup of coffee, tea, or even a cold glass of milk. For a dessert plate, I like to add fresh berries or sliced apples for some freshness to cut the richness.
Creative Ways to Present
For gift-giving, I like to stack squares in a pretty box lined with parchment and tie it up with a rustic ribbon. You can also serve the fudge on colorful mini cupcake liners to make each piece feel like a little treasure on your dessert table. At holiday parties, arranging the fudge on a festive platter with nuts and candies sprinkled around makes an eye-catching centerpiece.
Make Ahead and Storage
Storing Leftovers
When I make this fudge ahead of time, I store leftovers in an airtight container at room temperature for up to 3-4 days. If my kitchen is warm, I prefer to keep it in the fridge where it lasts a full week without losing that creamy texture. Just remember to bring it back to room temp before serving for the best bite.
Freezing
Freezing this fudge works like a charm! I wrap each fudge piece tightly in plastic wrap then pop them in an airtight freezer bag. They keep well for 2-3 months. When the craving hits, I simply thaw them at room temperature in the bag and voila—fudge that tastes freshly made.
Reheating
I usually don’t reheat fudge since it’s best served cool or at room temp. But if you prefer a slightly softer texture, you can warm a piece in your hand or place it in a warm (not hot!) spot for a bit; microwave reheating is tricky because it can melt unevenly and lose its shape.
FAQs
-
Can I use natural peanut butter for this fudge?
I don’t recommend natural peanut butter here because it has more oil separation and less sugar, which can cause the fudge to be grainy or not set properly. Classic creamy peanut butter brands work best for a smooth, creamy texture.
-
How long does this easy peanut butter fudge last?
Stored in an airtight container, it lasts 3-4 days at room temperature and up to 1 week refrigerated. You can also freeze it for 2-3 months with proper wrapping.
-
Can I add chocolate to this peanut butter fudge recipe?
Absolutely! Drizzling melted chocolate on top or swirling it into the mixture before chilling is a delicious twist. Just let the fudge set fully with the chocolate before cutting.
-
What if my fudge ends up too soft?
If your fudge is too soft, it might not have chilled long enough or the sugar measurement was off. Make sure you use sifted powdered sugar and chill for the full 2 hours. You can also pop it in the freezer briefly if you need to firm it up faster.
Final Thoughts
This Easy Peanut Butter Fudge Recipe is one of those beautiful, simple pleasures that feels like a small celebration every time you take a bite. It’s quick to make, forgiving, and incredibly delicious—perfect for squeezing into busy weeks or for impressing guests with very little effort. I hope when you make it, you enjoy it just as much as I do, whether solo as a cozy treat or shared with friends and family. Trust me, once you’ve got this one down, it will be a staple in your recipe box for good!
Print
Easy Peanut Butter Fudge Recipe
- Prep Time: 10 minutes
- Cook Time: 0 minutes
- Total Time: 2 hours 10 minutes
- Yield: 64 servings
- Category: Dessert
- Method: No-Cook
- Cuisine: American
Description
This delicious peanut butter fudge recipe combines creamy peanut butter, unsalted butter, vanilla, and powdered sugar to create a smooth, sweet treat that can be garnished with colorful M&M’s. Perfect for a festive dessert or a sweet snack, this no-bake fudge sets in the refrigerator and is easy to make with simple ingredients.
Ingredients
Main Ingredients
- 1 cup unsalted butter
- 1½ cups creamy peanut butter (NOT natural or no-stir varieties)
- 2 teaspoons vanilla extract
- 3¼ cups powdered sugar, sifted
- 1 tablespoon water (for the pan)
Optional Garnish
- M&M’s, 2-3 per piece of fudge
Instructions
- Prepare the pan: Using the bottom of the 8×8 baking dish as a template, cut out a piece of parchment paper to line the pan. This will help smooth the fudge and protect the top during chilling.
- Cut parchment overhang: Cut enough parchment paper to hang over the sides of the pan, allowing easy removal of the fudge later.
- Water for parchment placement: Pour 1 tablespoon of water into the bottom of the 8×8 pan to keep the parchment paper in place.
- Line the pan: Place the parchment paper into the prepared 8×8 pan, ensuring it is flat and secure.
- Heat butter and peanut butter: In a medium microwave-safe bowl, combine 1 cup unsalted butter and 1½ cups creamy peanut butter. Heat in the microwave for 60 seconds, then carefully remove and stir until smooth.
- Add vanilla: Stir in 2 teaspoons of vanilla extract until fully incorporated.
- Incorporate powdered sugar: Gradually add 3¼ cups sifted powdered sugar, about 1 cup at a time, stirring thoroughly between additions until the mixture is smooth, stiff, and no lumps or streaks remain.
- Transfer fudge to pan: Pour the peanut butter mixture into the prepared 8×8 pan, using a spatula to spread it evenly.
- Smooth the top: Place the pre-cut parchment paper on top of the fudge and use it to smooth the surface. Leave the parchment on top as you refrigerate.
- Chill fudge: Refrigerate the fudge for 2 hours to allow it to set properly.
- Score fudge: Remove fudge from refrigerator. Take off the top parchment paper and use a sharp knife to lightly score the fudge into the desired serving size squares, without cutting all the way through.
- Lift fudge from pan: Using the overhanging parchment paper edges, carefully lift the fudge out of the pan onto a cutting board.
- Slice fudge: Warm a large, sharp knife under hot water, dry it, and cut the fudge completely along the scored lines for clean slices.
- Add topping: Place 2-3 red and green M&M’s on top of each fudge piece as decoration, if desired.
- Store the fudge: Keep fudge in an airtight container. It stays fresh for 3-4 days at room temperature or up to 1 week refrigerated. Freeze for 2-3 months if desired.
Notes
- Store fudge in an airtight container to maintain freshness.
- Fudge can be frozen up to 2-3 months; wrap tightly in plastic then place in a freezer bag. Defrost at room temperature before serving.
- Choice of peanut butter affects flavor and color: Peter Pan is sweeter and darker; Skippy is lighter; Reese’s has an orange tint; JIF is saltier and lightest in color.
- Do not use natural or no-stir peanut butter as it will affect texture.
- Use warm knife to slice fudge for clean edges and easy cutting.
Nutrition
- Calories: 154 kcal
- Sugar: 15 g
- Sodium: 42 mg
- Fat: 9 g
- Saturated Fat: 5 g
- Unsaturated Fat: 3 g
- Trans Fat: 0 g
- Carbohydrates: 16 g
- Fiber: 0 g
- Protein: 2 g
- Cholesterol: 13 mg


