
If you love refreshing, melt-in-your-mouth treats, you’re going to adore this Cream Cheese Mint Cookies Recipe. These little mints are a nostalgic favorite for me — they’re bright, creamy, and pack just the right amount of minty zing. Plus, they’re super fun to make, especially when you get to play around with colorful food coloring. Stick around, because I’m sharing some tried-and-true tips so you can pull off this fan-freaking-tastic recipe effortlessly in your kitchen!

Why You’ll Love This Recipe
- Simple Ingredients: Cream cheese, powdered sugar, and mint extract combine for a rich yet refreshing flavor that’s easy to source.
- Vibrant Colors: The neon food coloring makes these mints eye-catching and fun — perfect for parties or gifting.
- No Baking Required: This recipe is perfect for when you want something sweet without turning on your oven.
- Customizable: You can easily tweak the mint intensity and colors to your liking, making it really feel like your own creation.
Ingredients & Why They Work
Every ingredient in this Cream Cheese Mint Cookies Recipe plays a special role, blending together for that classic creamy texture and minty fresh taste. Here’s why I always stick to these:
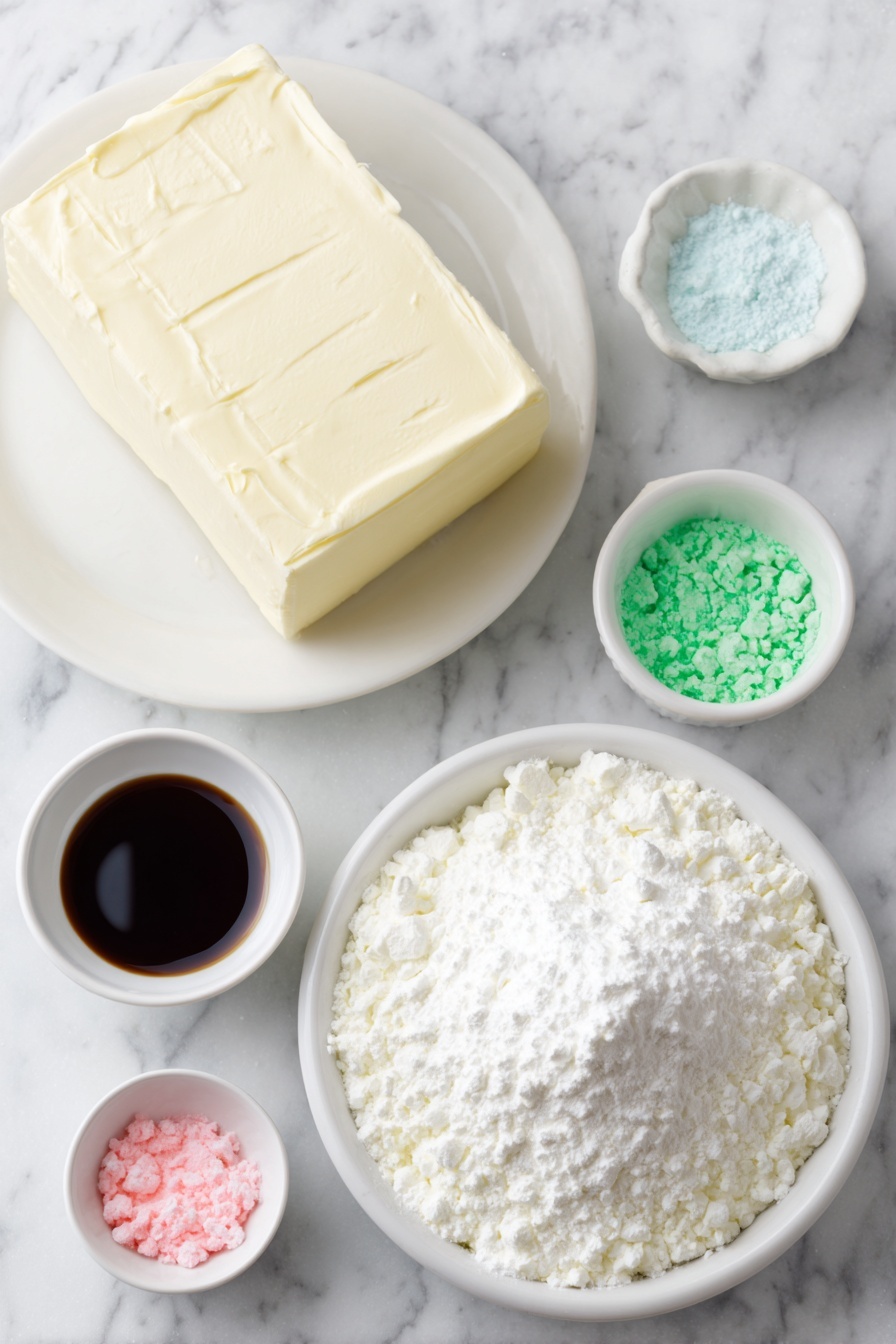
- Cream Cheese: Provides the base with a smooth, creamy texture and just enough tang to balance the sweetness.
- Butter: Adds richness and helps the mixture come together with a slight softness that’s just right.
- Powdered Sugar: Sweetens perfectly and also helps create the slightly crumbly, moldable dough.
- Mint Extract: This is your punch of freshness – don’t skip it! It makes all the difference in flavor.
- Gel Food Coloring: Neon green, pink, and blue bring a fun pop to these mints, making them irresistible — especially for gatherings or holidays.
Make It Your Way
This Cream Cheese Mint Cookies Recipe is great as-is, but I love playing around with the colors and sometimes tweaking the mint level. It’s all about making it yours and having fun in the kitchen, right?
- Variation: I’ve added a touch of vanilla extract once just for a subtle twist — it actually complements the mint nicely if you’re looking for something a little different.
- Dietary Modification: For a dairy-free take, you could try vegan cream cheese and butter alternatives, though I haven’t tried this myself yet—if you do, let me know how it turns out!
- Seasonal Colors: I like switching up the food coloring depending on holidays — reds and greens for Christmas, pastel shades for Easter — making these a perfect seasonal treat.
Step-by-Step: How I Make Cream Cheese Mint Cookies Recipe
Step 1: Soften and Mix the Base
Start by making sure your cream cheese and butter are truly softened to room temperature. This is the trickiest part because if they’re too cold, the mixture won’t blend smoothly. Pop them on your counter about 30-60 minutes ahead of time. Then, toss the cream cheese, butter, mint extract, and powdered sugar into a large mixing bowl. I use an electric hand mixer for about 3-4 minutes here. At first, it looks super crumbly and odd, but don’t worry — that’s normal.
Step 2: Knead the Dough by Hand
Once the electric mixer has done its job, set it aside and switch to working by hand. This part feels more like playdough time. Knead the mixture together until it forms a smooth ball. If it feels sticky, you can add 1 more tablespoon of cream cheese – I’ve done this a couple of times with perfect results. The texture should be pliable and moldable but not wet.
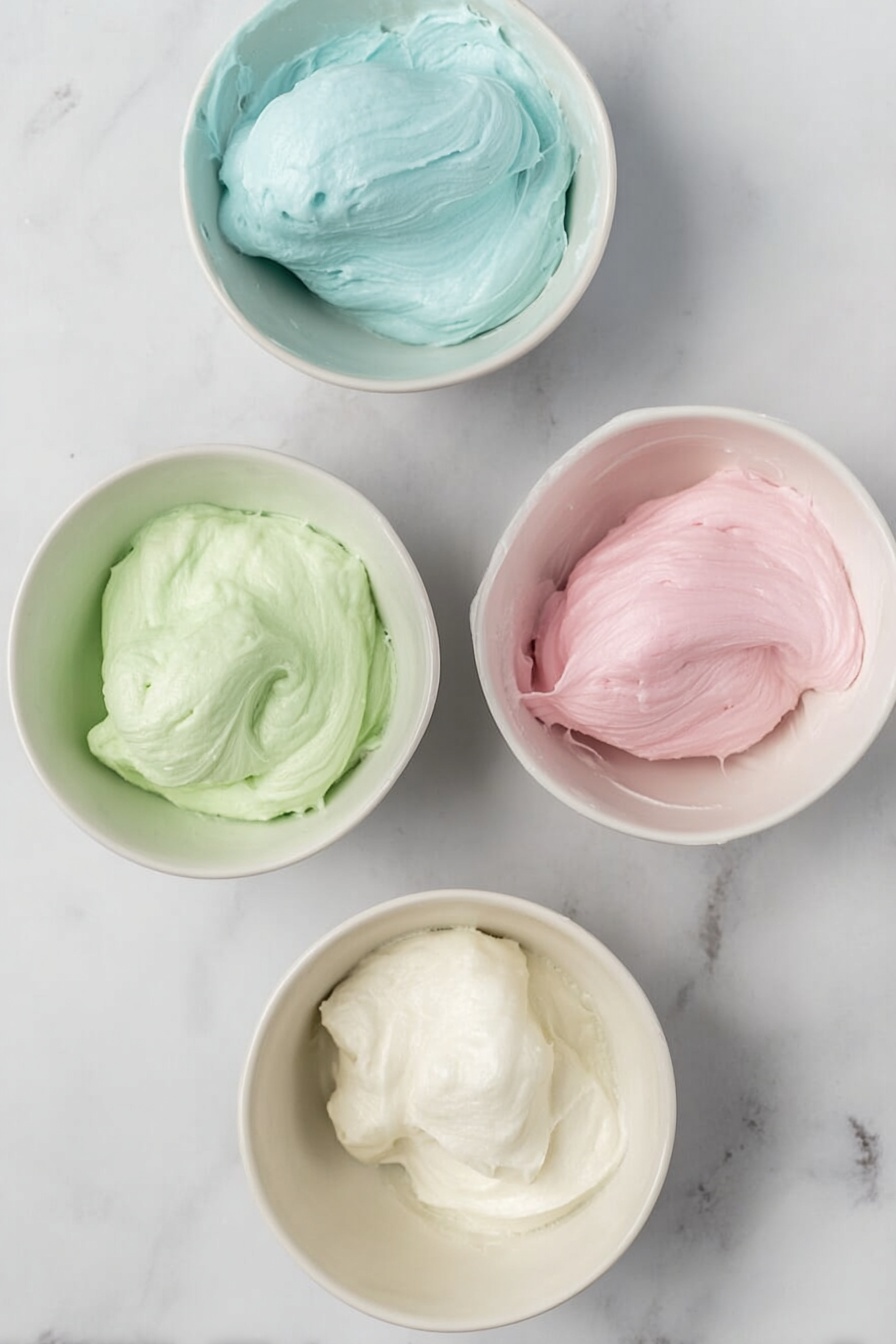
Step 3: Divide and Color the Dough
Slice your dough ball into four equal parts with a sharp knife. Pop each portion into its own small bowl. Now the fun begins: add 3-4 dots of neon green, neon pink, and classic blue gel food coloring to three of the bowls, leaving one plain for that classic white mint look. Use your hands or a fork to fold in the color until it’s vibrant and evenly blended. Pro tip: wash your hands between colors so they don’t all mix into a murky mess!
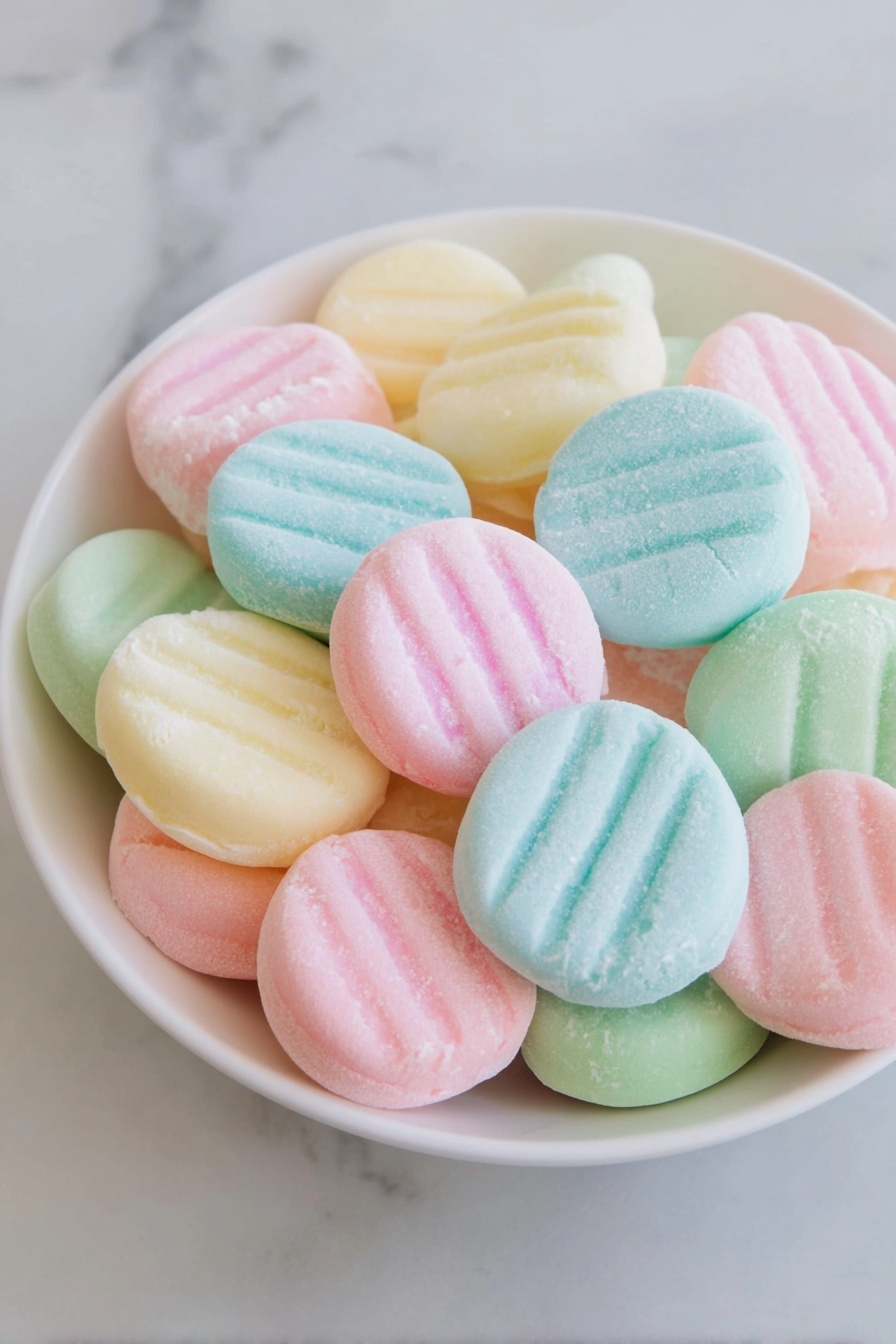
Step 4: Shape Your Mints
Prep a large baking sheet with parchment paper before rolling out the mints. Roll small teaspoon-sized balls from each dough color; it’s easiest to just pinch off a little, then gently roll between your palms. Place the balls spaced apart on the parchment-lined sheet. For that classic finish, dip a fork in powdered sugar and gently press into each ball, flattening it about halfway down. This gives a lovely texture and look, reminiscent of old-fashioned mints.
Step 5: Let Them Set
Let the mints rest at room temperature for 4 to 6 hours. Yes, patience is key here — this resting time allows them to firm up beautifully. If you try to eat them too soon, they’ll be too soft and won’t hold their shape as nicely.
Pro Tips for Making Cream Cheese Mint Cookies Recipe
- Perfect Softening: I swear by leaving cream cheese and butter on the counter for at least 30 minutes so the mixer can fully break them down—this helps avoid lumps in your dough.
- Mixing Method: Using both your mixer first and then hand kneading gives you that perfect playdough consistency that rolls and molds easily without crumbling.
- Color Control: Gel colors give you intense vibrancy without watering down the mixture like liquid food coloring can.
- Patience Pays Off: Don’t rush the resting period! Letting your mints set properly results in that satisfying firm bite we all love.
How to Serve Cream Cheese Mint Cookies Recipe
Garnishes
I like to dust a little extra powdered sugar over the mints just before serving for a delicate frosted look. You can also sprinkle a few tiny edible glitter shards if you’re feeling fancy for a party. The bright colors really stand out on a simple white platter or glass cake stand.
Side Dishes
These mints pair beautifully with a warm cup of herbal tea or a fresh mint-infused lemonade if you want something cool and refreshing. I’ve also served them alongside coffee at brunch, and they provide the perfect sweet finish to the meal.
Creative Ways to Present
For holiday gatherings, I like arranging the mints in colorful patterns — think stripes or polka dots — on trays lined with parchment paper. For gifting, wrapping a dozen in clear cellophane bags tied with a mint green ribbon never fails to impress friends and family.
Make Ahead and Storage
Storing Leftovers
I store leftover Cream Cheese Mint Cookies in an airtight container in the fridge to keep them fresh for up to two weeks. Layering parchment paper between mint batches saves them from sticking together, which is a real time-saver.
Freezing
Freezing works like a charm with these mints! I place parchment paper between layers in an airtight container or freezer bag and freeze them for up to a few months. When I’m ready to enjoy them again, I thaw them in the fridge overnight. They come back tasting just as good as fresh.
Reheating
No reheating needed here. These mints are best served cold or at room temperature to preserve their texture and flavor. Just pull them out of the fridge 10-15 minutes before serving, and they’re perfect!
FAQs
-
Can I use liquid food coloring instead of gel?
While you can technically use liquid food coloring, it’s not recommended for this Cream Cheese Mint Cookies Recipe. Liquid colors can make the dough too soft and sticky, affecting the texture and the vibrant colors you want. Gel food coloring is concentrated and won’t change the consistency.
-
What if my mixture is too sticky to roll?
If your dough feels sticky, first try adding a little more powdered sugar a tablespoon at a time. Alternatively, kneading a bit more on a lightly floured surface can help firm it up. Also, make sure your cream cheese and butter weren’t too warm, as overheating can create a softer dough.
-
How strong is the mint flavor? Can I adjust it?
The mint flavor is pleasantly bold but not overpowering. You can absolutely adjust it by adding more or less mint extract when mixing. I recommend starting with the stated amount, then tasting the dough before coloring to see if you want to boost the mintiness.
-
Do these cookies melt if left out in warm weather?
Because they contain cream cheese and butter, these mints can get softer in warm environments. It’s best to keep them refrigerated or serve at room temperature in a cool space, especially during hot months.
Final Thoughts
This Cream Cheese Mint Cookies Recipe has become one of my all-time favorites for sharing with friends and family. There’s something nostalgic and cozy about the creamy texture coupled with that fresh mint punch. Plus, the colorful aspect always sparks joy and conversation when I bring them out. I’m confident if you give this recipe a shot, you’ll find it as addictive and rewarding as I do. Trust me, these mints will brighten your day — invite your loved ones into your kitchen and enjoy the process as much as the delicious result.
Print
Cream Cheese Mint Cookies Recipe
- Prep Time: 10 minutes
- Cook Time: 0 minutes
- Total Time: 6 hours 10 minutes
- Yield: 40 servings
- Category: Dessert
- Method: No-Cook
- Cuisine: American
- Diet: Vegetarian
Description
This Cream Cheese Mints recipe creates colorful, soft mints with a smooth texture and refreshing mint flavor, perfect for parties or gifting. Made from cream cheese, butter, powdered sugar, and mint extract, these no-bake treats are easy to prepare and require some resting time to set properly.
Ingredients
Main Ingredients
- 4 ounces cream cheese softened to room temperature
- 1 tablespoon butter softened
- 4 cups powdered sugar
- ½ teaspoon mint extract
Coloring
- Neon green gel food coloring
- Neon pink gel food coloring
- Classic blue gel food coloring
Instructions
- Combine Ingredients: Add cream cheese, butter, mint extract, and powdered sugar into a large mixing bowl.
- Mix with Electric Mixer: Use an electric hand or stand mixer to blend the ingredients for 3-4 minutes until the mixture is crumbly and well combined.
- Knead the Mixture: Set the mixer aside and use your hands to knead the mixture, forming it into a smooth, round ball resembling playdough. Add 1 tablespoon of cream cheese if sticky.
- Divide the Dough: Cut the dough ball into 4 equal parts using a sharp knife and place each portion into small bowls.
- Add Food Coloring: To three bowls, add 3-4 dots of neon green, neon pink, and classic blue gel food coloring respectively, leaving one bowl plain for white mints. Mix in the color thoroughly by hand or fork until uniformly blended.
- Prepare Baking Sheet: Line a large baking sheet with parchment paper for the mints to rest on.
- Roll the Mints: Roll teaspoon-sized balls of each colored dough and place them spaced on the parchment.
- Flatten the Mints: Dip a fork in powdered sugar, then press each ball gently with the fork, flattening them about halfway down to create a mint shape.
- Allow to Set: Let the mints rest uncovered at room temperature for 4-6 hours to firm up before serving.
Notes
- Store the mints in an airtight container in the refrigerator for up to 2 weeks.
- To freeze, layer mints with parchment paper in airtight containers or freezer bags and freeze for a few months; thaw in the fridge before eating.
- Use both neon and traditional gel food coloring packets for vibrant colors.
- Ensure the cream cheese and butter are fully softened for easy mixing and proper texture.
- The mixture might be crumbly at first but will become pliable after mixing and kneading.
- Washing your hands between handling different colors prevents color mixing.
- Add an additional tablespoon of cream cheese only if the dough feels sticky; it should have a playdough-like consistency.
Nutrition
- Calories: 28 kcal
- Sugar: 7 g
- Sodium: 3 mg
- Fat: 0 g
- Saturated Fat: 0 g
- Unsaturated Fat: 0 g
- Trans Fat: 0 g
- Carbohydrates: 7 g
- Fiber: 0 g
- Protein: 0 g
- Cholesterol: 2 mg


