
If you’re craving a festive cookie that’s buttery, minty, and just downright delightful, you’re going to fall head over heels for this Candy Cane Kiss Cookies Recipe. These cookies are my go-to for holiday gatherings, and honestly, they make your kitchen smell like Christmas magic in the best way possible. Stick around—I’ll walk you through every step to help you bake these beauties with ease and confidence!

Why You’ll Love This Recipe
- Perfect Holiday Flavor: The peppermint extract combined with crushed candy canes and Hershey’s Candy Cane Kisses give you that iconic minty holiday taste.
- Easy to Make: The steps are straightforward — great for baking with kids or when you want a stress-free holiday treat.
- Make-Ahead Friendly: Chilling the dough overnight actually improves the texture and flavor, so you can prep ahead and relax.
- Impressively Beautiful: Those candy cane kisses pressed on top aren’t just tasty, they make these cookies look like holiday jewels.
Ingredients & Why They Work
The ingredients in this Candy Cane Kiss Cookies Recipe come together to create a cookie that’s soft yet slightly crunchy from the candy cane bits, with a sweet minty punch. Using unsalted butter allows you to control the saltiness, and the peppermint extract amps up the flavor without overpowering.
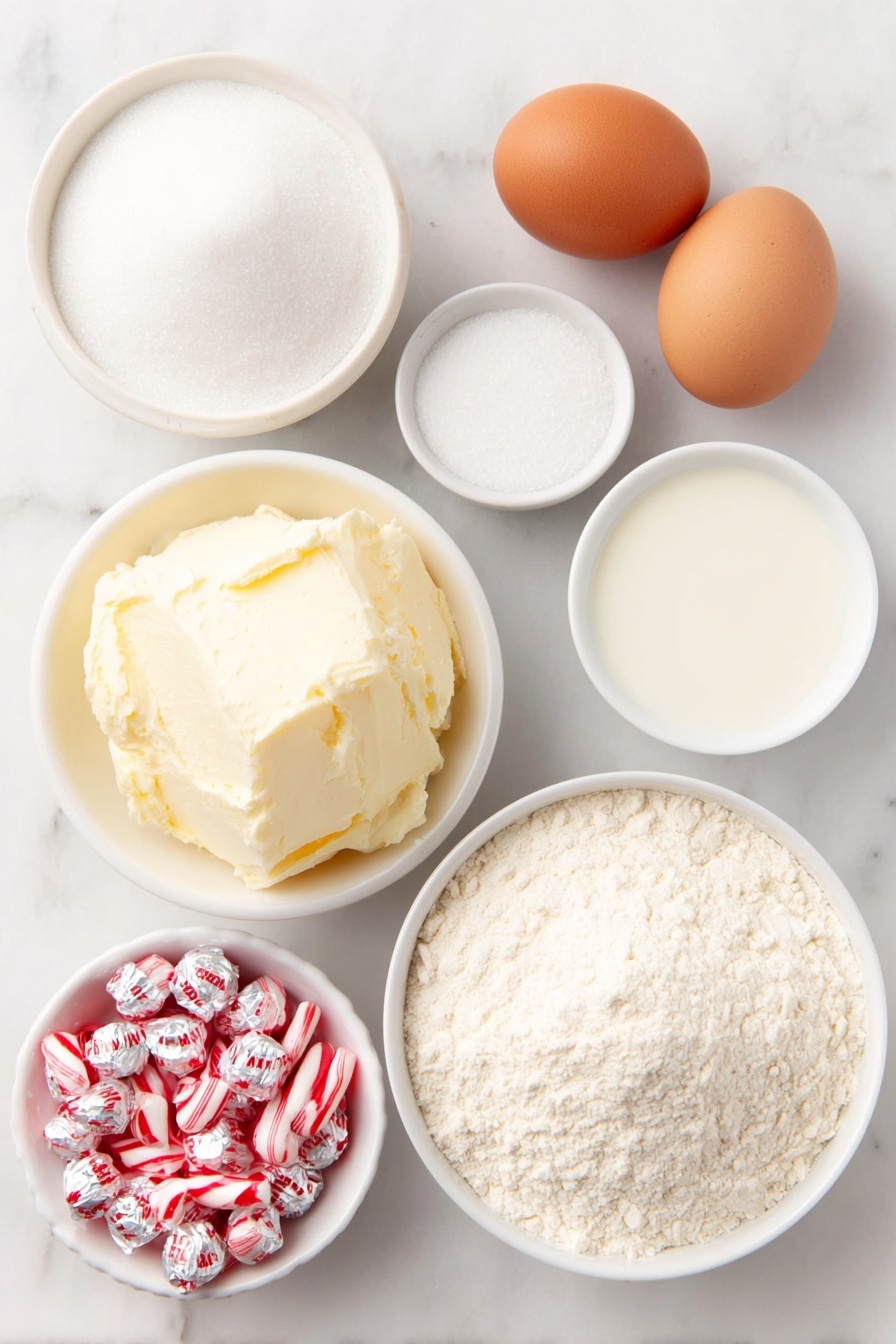
- Unsalted Butter: Softened butter provides creaminess and richness while keeping control over salt levels.
- White Sugar: Split between dough and coating, sugar helps sweetness and creates a little crunch on the outside.
- Large Egg: Eggs bind everything and add moisture, so your cookies stay soft but hold together.
- Vanilla Extract: Adds depth of flavor that complements peppermint perfectly.
- Peppermint Extract: Key for that unmistakable candy cane taste.
- All-Purpose Flour: The base that gives structure without making cookies too dense.
- Baking Soda: Helps cookies rise just enough for a soft texture.
- Salt: Balances sweetness and heightens all the flavors.
- Milk: Keeps the dough tender and easier to work with.
- Crushed Candy Canes: Add crunchy bursts of peppermint and a festive look.
- Hershey’s Candy Cane Kisses: The star topping that melty, minty, and gooey—a perfect finish!
Make It Your Way
I like these Candy Cane Kiss Cookies just as they are, but a few tweaks here and there can make them your own. Whether you’re into extra crunch or prefer a softer bite, there’s room to play — and trust me, experimenting is half the fun!
- Chocolate Dip: I once dipped half the cookies in melted dark chocolate for a richer flavor contrast—so good for chocolate lovers!
- Gluten-Free Version: Swapping the all-purpose flour with a 1:1 gluten-free blend works well, just watch the dough consistency.
- Extra Peppermint Punch: Sometimes I add a bit more peppermint extract, but be careful—it’s all about balance.
- Festive Sprinkles: Try colorful holiday sprinkles instead of sugar coating to jazz up the presentation.
Step-by-Step: How I Make Candy Cane Kiss Cookies Recipe
Step 1: Prep Like a Pro
First things first, line two baking sheets with parchment paper and set them aside. Trust me, this simple step saves you from a sticky, messy cleanup later. Then, make sure your butter is nicely softened—it should be soft enough to press with your finger but not melting. This helps with creaming perfectly for that soft, pillowy cookie texture.
Step 2: Cream the Butter and Sugar
Using a handheld mixer (I like medium-low speed), cream together the softened butter and 1 cup of the sugar until fluffy—about 1 to 2 minutes. This step is where your cookies get that silky smooth base flavor and texture, so don’t rush it. You’ll know it’s ready when the mixture looks lighter in color and soft.
Step 3: Add the Eggs and Extracts
Next, crack in your egg, then pour in the vanilla and peppermint extracts. Mix again for about a minute until everything is blended nicely. The peppermint gives that crisp mint aroma that’ll make you feel instantly festive, while vanilla adds a subtle richness.
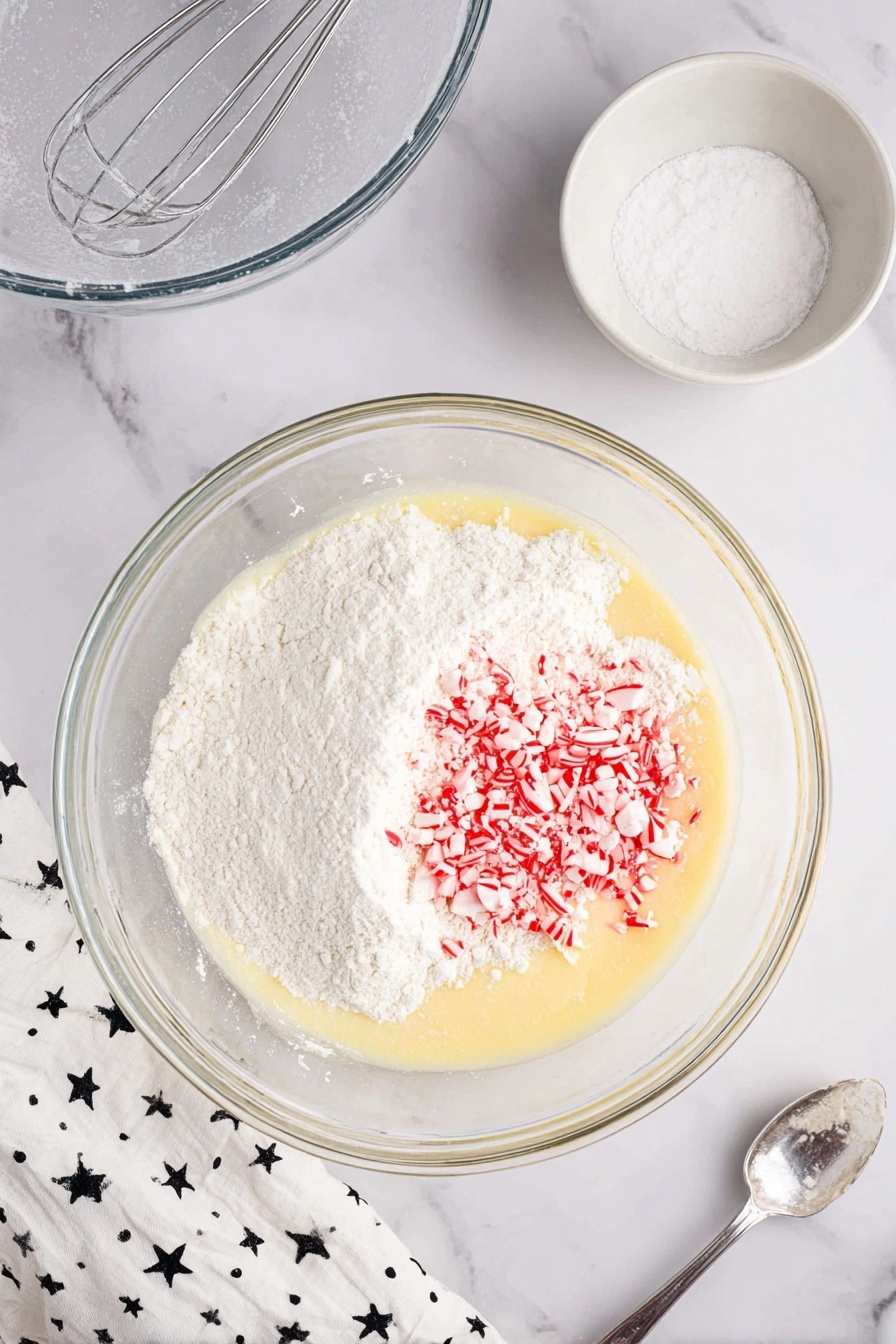
Step 4: Mix Dry Ingredients Separately
In a separate bowl, whisk together the all-purpose flour, baking soda, and salt. Combining the dry ingredients separately is a little trick I use to avoid overmixing and to ensure even flavor distribution in every bite.
Step 5: Combine and Add Candy Canes
Slowly add the flour mixture, milk, and crushed candy canes to your wet ingredients. Beat just until everything comes together—this usually takes about 30 seconds. Overmixing here can make cookies tough, and we want them tender with little bursts of peppermint candy.
Step 6: Shape and Chill the Dough Balls
Scoop the dough in roughly 1-tablespoon portions, then roll each into a smooth ball between your hands. Next, roll these dough balls in the remaining ¼ cup of sugar so they’ll have a little glimmer and subtle crunch on the outside. Arrange them 2 inches apart on your prepared cookie sheets, then pop both trays in the fridge for 2 hours. I know, waiting is tough—but chilling is key to the perfect cookie shape and prevents spreading too much.
Step 7: Bake and Add Your Kisses
While the dough chills, preheat your oven to 375°F. When ready, bake your cookies for about 10 minutes or until the centers are set but the edges are still soft. Let them cool on the pan for 5 minutes — patience here helps the cookies hold their shape. Then, gently press an unwrapped Hershey’s Candy Cane Kiss into the center of each warm cookie. The heat melts the bottom slightly, creating a gorgeous glossy finish once cooled.
Pro Tips for Making Candy Cane Kiss Cookies Recipe
- Don’t Skip Chilling: The 2-hour fridge time helps the cookies keep their shape and prevents excess spreading—trust me, the patience pays off.
- Use Fresh Candy Canes: Crushing fresh candy canes yields better crunch and stronger peppermint flavor than old or stale ones.
- Smooth Dough Balls: Rolling cookie dough between your palms ensures cookies bake evenly and look beautiful.
- Timing the Kiss Placement: Pressing the Kiss onto slightly cooled cookies keeps the chocolate from melting too much, blending the perfect texture balance.
How to Serve Candy Cane Kiss Cookies Recipe

Garnishes
I usually keep garnishes simple to let the cookie shine, but a light dusting of powdered sugar adds a snowy effect that’s just so festive. If you want to go extra, pairing with crushed peppermint sprinkle around the edges looks stunning and tastes amazing.
Side Dishes
These cookies pair wonderfully with a hot cup of cocoa or a peppermint mocha latte. For a party, I like to serve them alongside gingerbread men or cinnamon-spiced nuts to create a festive cookie platter bursting with flavors.
Creative Ways to Present
For gift-giving or holiday parties, I love packaging these Candy Cane Kiss Cookies Recipe treats stacked in a clear jar with red and white ribbons for that classic Christmas vibe. Or, arrange them on a festive plate with mini candy cane stir sticks and holiday greenery—super charming!
Make Ahead and Storage
Storing Leftovers
I store leftover Candy Cane Kiss Cookies in a sealed container at room temperature. They stay soft and delicious for 5 to 7 days—plenty of time to enjoy or share with friends. Make sure the container’s airtight to keep the peppermint candies from absorbing moisture.
Freezing
I’ve had great luck freezing the cookie dough balls before baking. Just scoop and roll them, freeze on a tray, then transfer to a freezer bag. When you’re ready, bake straight from frozen but add a minute or two to baking time. This makes holiday prep so easy when things get busy!
Reheating
If you want to enjoy the cookies warm, pop them in a 300°F oven for about 5 minutes or microwave for 10-15 seconds. This refreshes that melty Kiss center and soft texture beautifully without overcooking.
FAQs
-
Can I use regular chocolate kisses instead of Candy Cane Kisses?
You definitely can, but swapping for Candy Cane Kisses gives that unique peppermint finish that defines this cookie. Regular chocolate will taste great but won’t have that signature mint crunch.
-
What if I don’t have peppermint extract?
If you don’t have peppermint extract, you can substitute with a few drops of peppermint oil or even a bit of crushed peppermint candies mixed into the dough, but the extract really brings the best flavor balance.
-
Why do I need to chill the dough for 2 hours?
Chilling firms up the cookie dough balls, which prevents them from spreading too much while baking, helping to keep the soft and chewy texture you want—and that iconic shape.
-
Can I make these cookies gluten-free?
Yes! I recommend using a high-quality 1:1 gluten-free flour blend and watching your dough consistency. You might need a teaspoon more milk if it feels too dry.
Final Thoughts
This Candy Cane Kiss Cookies Recipe holds a special place in my heart because it’s simple to make yet brings so much joy to gatherings and quiet nights alike. I truly hope you give it a try—it’s like a little piece of cozy, minty happiness wrapped up in every bite. When you bake these, you’re not just making cookies; you’re creating holiday memories. So grab your mixer, dust off that peppermint extract, and get baking—you won’t regret it!
Print
Candy Cane Kiss Cookies Recipe
- Prep Time: 15 minutes
- Cook Time: 10 minutes
- Total Time: 2 hours 25 minutes
- Yield: 28 cookies
- Category: Dessert
- Method: Baking
- Cuisine: American
Description
Delight in the festive flavors of Candy Cane Kiss Cookies, featuring a soft, peppermint-infused dough coated in sugar and topped with a classic Hershey’s Candy Cane Kiss. Perfect for holiday celebrations, these cookies combine a buttery base with the crunch of candy canes for a refreshing minty treat.
Ingredients
Cookie Dough
- ½ cup unsalted butter softened
- 1¼ cup white sugar divided
- 1 large egg
- 1 tsp vanilla extract
- ½ tsp peppermint extract
- 2 cups all-purpose flour
- ¼ tsp baking soda
- ¼ tsp salt
- 2 tsp milk
- ½ cup crushed candy canes
Topping
- 28 Hershey’s Candy Cane Kisses
Instructions
- Prepare Baking Sheets: Line two baking sheets with parchment paper and set them aside for later use to prevent sticking.
- Cream Butter and Sugar: Using a handheld mixer on medium-low speed, cream together the softened butter and 1 cup of white sugar until the mixture is fluffy, about 1-2 minutes.
- Add Wet Ingredients: Add the egg, vanilla extract, and peppermint extract to the creamed butter mixture. Mix for another 1 minute until well combined.
- Mix Dry Ingredients: In a separate bowl, stir together the all-purpose flour, baking soda, and salt until evenly combined.
- Combine Mixtures: Add the flour mixture, milk, and crushed candy canes to the wet ingredients. Beat the mixture just until combined, about 30 seconds, avoiding overmixing.
- Form Cookie Balls: Scoop the dough into 1 tablespoon-sized portions. Use your hands to roll each portion into a smooth ball, shaping the edges.
- Coat with Sugar: Roll each cookie dough ball in the remaining ¼ cup of white sugar, ensuring an even coating on the outside.
- Chill Dough: Place the sugar-coated dough balls on the prepared baking sheets about 2 inches apart. Refrigerate the cookie dough balls flat for 2 hours to chill before baking.
- Preheat Oven: While the dough chills, preheat your oven to 375 degrees Fahrenheit.
- Bake Cookies: Bake the chilled cookies for 10 minutes, or until the centers are set but still soft.
- Add Candy Cane Kisses: After baking, let the cookies cool for 5 minutes, then immediately press an unwrapped Hershey’s Candy Cane Kiss in the center of each cookie to create a festive topping.
Notes
- Store leftover cookies at room temperature in a sealed container for up to 5-7 days to maintain freshness.
- Crushed candy canes add a delightful crunch, but you can substitute with peppermint chips if preferred.
- Ensure the dough balls are well chilled before baking to prevent spreading and maintain shape.
- For an extra festive look, consider using colored sugar or sprinkles along with the coating sugar.
Nutrition
- Calories: 150 kcal
- Sugar: 14 g
- Sodium: 40 mg
- Fat: 7 g
- Saturated Fat: 4.5 g
- Unsaturated Fat: 2 g
- Trans Fat: 0.2 g
- Carbohydrates: 22 g
- Fiber: 0.3 g
- Protein: 2 g
- Cholesterol: 20 mg


